
Halo 2 in HD: Pushing the Original Xbox to the Limit
This blog post goes over all of the work I’ve done to add HD resolution support to the Original Xbox version of Halo 2. From patching the game to modifying the hardware of the Xbox console to writing custom tools for performance benchmarking, my goal with this project was to push the limits of both and see how far I could go. I’ve tried to keep this blog post as short as I could and only include the most technically interesting parts but even then it ended up quite long.
Prelude
A long time friend who goes by the handle “doom” has spent the past few years reverse engineering and researching the hardware and software on the original Xbox. His end goal was to learn more about PC hardware and see how far he could push the console. Some of his work includes swapping out the stock Pentium 3 CPU running at 733Mhz for a variant of the Pentium 3 CPU running at 1.4Ghz using a custom made CPU interposer board, and even being able to overclock it upwards of ~2Ghz.
Doom also wrote custom patches for the Xbox kernel in order to on-the-fly patch timing calculations for games so they ran properly with the faster CPU. Combined with a few other hardware upgrades such as additional RAM and an SSD, doom started to refer to these as “god boxes”. These god boxes were also running a custom kernel (or BIOS image) that doom made to support all of the hardware modifications and push the hardware and software as far as they could go. One of his demos for his work was showing the opening sequence in Half-Life 2 which is notorious for abysmally slow loading times and poor performance on the Xbox, running at a solid 30 FPS and loading in a matter of seconds. But there were still additional benefits to be had. Doom wanted someone to create a proper HD resolution patch for a popular game and really utilize the hardware upgrades he performed.
One night while talking over Discord doom asked if I would be interested in developing an HD patch for Halo 2 and in exchange he would provide me with a god box to develop it on. Halo 2 has a max supported video resolution of 480p and patching in support for 720p (and possibly 1080i) would get a lot of attention to demonstrate the benefits of all this work. We both knew that many of the community “HD” or “720p” game patches were not actually functioning correctly and that patching in HD resolution support for a game was more work than just searching for 640/480 in a disassembler and changing the resolution. These patches require a deep understanding of 3D graphics, DirectX APIs, and a lot of specific knowledge about the game and Xbox console. Having spent years reverse engineering the Xbox and Halo 2’s game engine I had the perfect background to take on the task. As doom would put it “there’s nobody more qualified than you to do it for halo 2 so that’s why I asked”. While it piqued my interest (and I was pretty jealous of these god boxes and all the experience he’d gotten developing them), I made a request/requirement before I would even entertain the idea.
The upgraded CPU has more than double the processing power compared to the stock CPU, however, the GPU was going to take on most of the increased processing load once the video resolution was increased. After all, each additional pixel in the output image would result in more pixel shader calculations which meant more work the GPU would have to do. If he could manage to overclock the GPU I would do it, but at stock clock speeds it wasn’t worth the time it would take to develop this patch just to have it fall over on the GPU. He said he would look into it, and after a few weeks time he came back and said it was done. He managed to overclock the GPU by ~15%, and said he had the “GENESIS-3” console ready for me (a nickname for the 3rd iteration of the “god box” upgrades he’d been working on).
Part 1: Rendering in HD
Having spent the past few years reverse engineering and re-implementing the Halo 2 rendering engine I already had a mental list of things I’d need to change to support higher video resolutions. The first thing that needed to be changed was the size of the D3D front and back buffers. The setup for the D3D device has 3 functions that need to be modified in order to use the proper resolution for the current video mode. The first is _rasterizer_detect_video_mode which checks the video mode and sets some global variables for widescreen and progressive video modes. Next is _rasterizer_init_screen_bounds which sets up the screen dimensions used for creating the D3D device, view frustum, and a number of other things. Lastly is rasterizer_device_initialize which is responsible for setting up the D3D device. Below is a shortened version of these 3 functions with the lines of interest highlighted. All of the code shown in this post has been reverse engineered from assembly back into C for ease of understanding.
|
1 2 3 4 5 6 7 8 9 10 11 12 13 14 15 16 17 18 19 20 21 22 23 24 25 26 27 28 29 30 31 32 33 34 35 36 37 38 39 40 41 42 43 44 45 46 47 48 49 50 51 52 53 54 55 56 57 58 59 60 61 62 63 64 65 |
void _rasterizer_detect_video_mode() { DWORD videoStandard = XGetVideoStandard(); DWORD videoFlags = XGetVideoFlags(); if (videoStandard == XC_VIDEO_STANDARD_PAL_I) g_refresh_rate_hz = (videoFlags & XC_VIDEO_FLAGS_PAL_60Hz) != 0 ? 60 : 50; g_letterbox_enabled = (videoFlags & XC_VIDEO_FLAGS_LETTERBOX) != 0; g_widescreen_enabled = (videoFlags & XC_VIDEO_FLAGS_WIDESCREEN) != 0; g_progressive_scan_enabled = (videoFlags & XC_VIDEO_FLAGS_HDTV_480p) != 0; ... } void _rasterizer_init_screen_bounds(int x_off, int y_off, float scale) { float width = 640.0f * scale; float height = 480.0f * scale; rasterizer_globals.screen_bounds.x0 = 0; rasterizer_globals.screen_bounds.y0 = 0; rasterizer_globals.screen_bounds.x1 = (int)width; rasterizer_globals.screen_bounds.y1 = (int)height; rasterizer_globals.frame_bounds.x0 = x_off; rasterizer_globals.frame_bounds.y0 = y_off; rasterizer_globals.frame_bounds.x1 = (int)width - x_off; rasterizer_globals.frame_bounds.y1 = (int)height - y_off; } bool rasterizer_device_initialize() { ... D3DPRESENT_PARAMETERS PresentParams = {0}; PresentParams.BackBufferWidth = rasterizer_globals.screen_bounds.x1 - rasterizer_globals.screen_bounds.x0; PresentParams.BackBufferHeight = rasterizer_globals.screen_bounds.y1 - rasterizer_globals.screen_bounds.y1; PresentParams.BackBufferFormat = D3DFMT_A8R8G8B8; PresentParams.EnableAutoDepthStencil = TRUE; PresentParams.AutoDepthStencilFormat = D3DFMT_D24S8; PresentParams.Flags = D3DPRESENTFLAG_LOCKABLE_BACKBUFFER; PresentParams.FullScreen_RefreshRateInHz = g_refresh_rate_hz; PresentParams.FullScreen_PresentationInterval = D3DPRESENT_INTERVAL_IMMEDIATE; switch (g_presentation_interval) { case 0: PresentParams.SwapEffect = D3DSWAPEFFECT_FLIP; PresentParams.FullScreen_PresentationInterval = D3DPRESENT_INTERVAL_IMMEDIATE; break; case 1: PresentParams.SwapEffect = D3DSWAPEFFECT_DISCARD; PresentParams.FullScreen_PresentationInterval |= g_present_immediately != 0 ? D3DPRESENT_INTERVAL_ONE : 0; break; case 2: PresentParams.SwapEffect = D3DSWAPEFFECT_DISCARD; PresentParams.FullScreen_PresentationInterval |= g_present_immediately != 0 ? D3DPRESENT_INTERVAL_TWO : 0; break; } g_pDirect3D->CreateDevice(0, D3DDEVTYPE_HAL, NULL, D3DCREATE_HARDWARE_VERTEXPROCESSING, &PresentParams, &g_pD3DDevice); ... } |
Halo 2 already supports 480p, or does it…
If you’ve ever looked at the back of the game case for Halo 2 you might have seen it supports 480p. However, looking at line 42 above, the D3DPRESENTFLAG_PROGRESSIVE flag is not being set on the present parameters. And, if we look at the call site for the _rasterizer_init_screen_bounds function we see this:
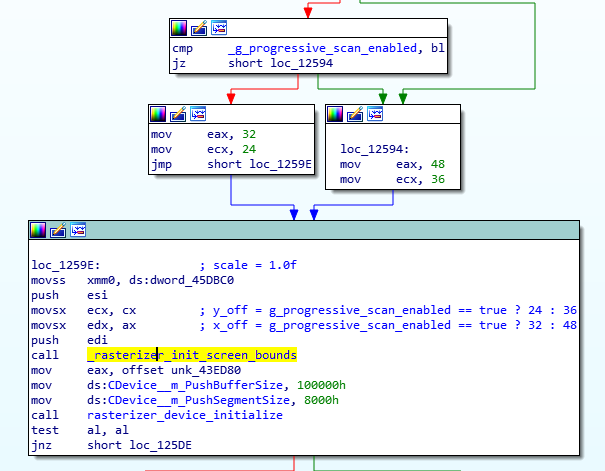
The scale parameter is always set to 1.0f, which means the screen_bounds are always set to 640×480 regardless of what the video mode is set to on the console. On the Original Xbox 480p is considered to be 720×480, which means that Halo 2 does not render in 480p natively regardless of what the video settings are set to. If you enable 480p mode on the console you’ll get a 480p signal out but that’s because after the game is done drawing to the 640×480 back buffer it’ll get up-scaled to 720×480 by the GPU before being fed to the video encoder. I often get comments saying “that’s not not a 16:9 resolution” or “that’s not real 480p”, but “480p” encapsulates a range of resolutions and aspect ratios and 720×480 is the resolution the Xbox considers to be 480p (so take it up with Microsoft, not me…).
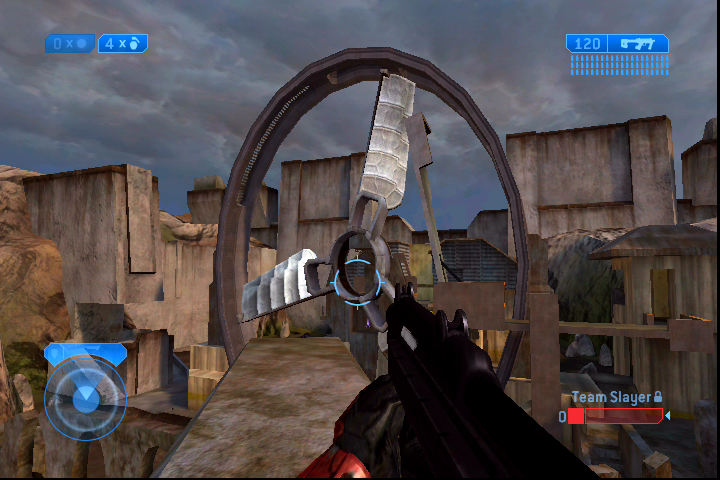
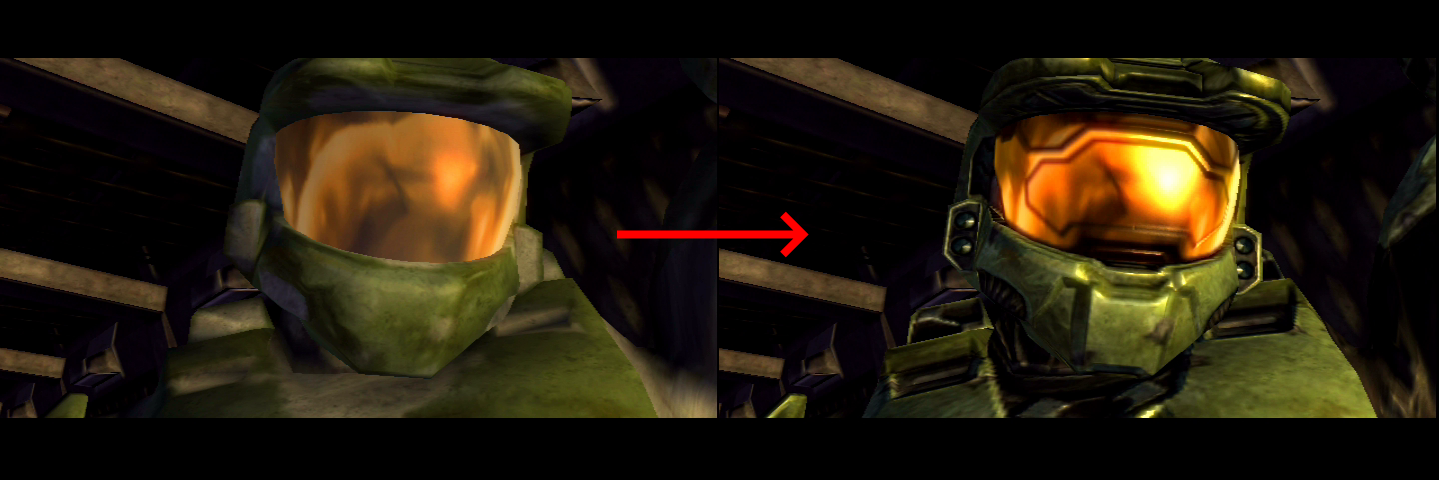
If you’ve ever played Halo 2 in 480p mode with wide screen enabled you may have noticed that things look a little weird. That’s because when wide screen mode is enabled the game will use an anamorphic camera with an aspect ratio of 1.33:1. That means it renders 1.3x the width into the same 640×480 surface as it would when wide screen mode is disabled. Here is a comparison showing the effect anamorphic scaling has on the Zanzibar wheel:
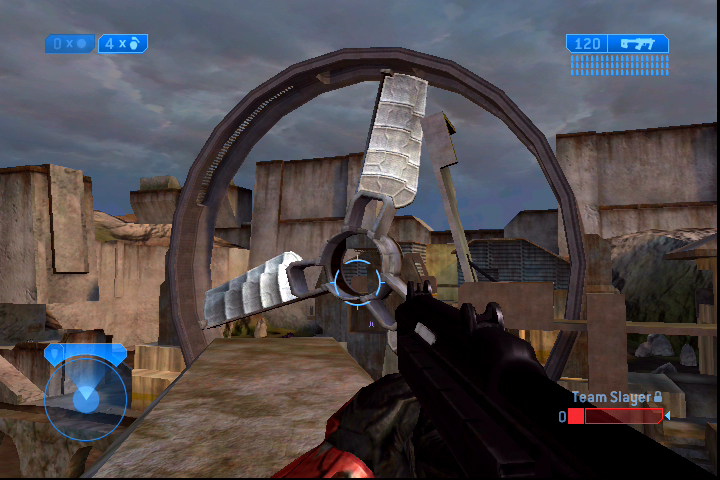
I’m not entirely sure why it does this and my only guess is if you set your TV to stretch mode it would “cancel out” the horizontal “squish” introduced by the anamorphic scaling and look somewhat normal. However, I personally hate it and wanted the cleanest image I could get out of the console so I added an option to disable the anamorphic scaling entirely.
Back to the back buffer…
To create the D3D front/back buffers with the right dimensions we’ll need to change g_progressive_scan_enabled to be set when 720p is enabled, set the screen_bounds and frame_bounds variables based on the proper video resolution for the video mode set, and finally set some additional flags on the D3D present parameters depending on if the video mode is progressive or interlaced (1080i mode). The pseudo code for the modifications is shown below with the changed lines highlighted. I ignored the scale variable in _rasterizer_init_screen_bounds because it’s only ever set to 1.0 anyway.
|
1 2 3 4 5 6 7 8 9 10 11 12 13 14 15 16 17 18 19 20 21 22 23 24 25 26 27 28 29 30 31 32 33 34 35 36 37 38 39 40 41 42 43 44 45 46 47 48 49 50 51 52 53 54 55 56 57 58 59 60 61 62 63 64 65 66 67 68 69 70 71 72 73 74 75 76 77 78 79 80 81 82 83 84 |
void _rasterizer_detect_video_mode() { DWORD videoStandard = XGetVideoStandard(); DWORD videoFlags = XGetVideoFlags(); if (videoStandard == XC_VIDEO_STANDARD_PAL_I) g_refresh_rate_hz = (videoFlags & XC_VIDEO_FLAGS_PAL_60Hz) != 0 ? 60 : 50; g_letterbox_enabled = (videoFlags & XC_VIDEO_FLAGS_LETTERBOX) != 0; g_widescreen_enabled = (videoFlags & XC_VIDEO_FLAGS_WIDESCREEN) != 0; g_progressive_scan_enabled = (videoFlags & (XC_VIDEO_FLAGS_HDTV_480p | XC_VIDEO_FLAGS_HDTV_720p)) != 0; ... } void _rasterizer_init_screen_bounds(int x_off, int y_off, float scale) { // Set default resolution to 640x480. float width = 640.0f; float height = 480.0f; // Adjust resolution based on current video mode set. DWORD videoFlags = XGetVideoFlags(); if ((videoFlags & XC_VIDEO_FLAGS_HDTV_1080i) != 0) { width = 1920; height = 1080; } else if ((videoFlags & XC_VIDEO_FLAGS_HDTV_720p) != 0) { width = 1280; height = 720; } else if ((videoFlags & XC_VIDEO_FLAGS_HDTV_480p) != 0) { width = 720; } rasterizer_globals.screen_bounds.x0 = 0; rasterizer_globals.screen_bounds.y0 = 0; rasterizer_globals.screen_bounds.x1 = (int)width; rasterizer_globals.screen_bounds.y1 = (int)height; rasterizer_globals.frame_bounds.x0 = x_off; rasterizer_globals.frame_bounds.y0 = y_off; rasterizer_globals.frame_bounds.x1 = (int)width - x_off; rasterizer_globals.frame_bounds.y1 = (int)height - y_off; } bool rasterizer_device_initialize() { ... D3DPRESENT_PARAMETERS PresentParams = {0}; PresentParams.BackBufferWidth = rasterizer_globals.screen_bounds.x1 - rasterizer_globals.screen_bounds.x0; PresentParams.BackBufferHeight = rasterizer_globals.screen_bounds.y1 - rasterizer_globals.screen_bounds.y1; PresentParams.BackBufferFormat = D3DFMT_A8R8G8B8; PresentParams.EnableAutoDepthStencil = TRUE; PresentParams.AutoDepthStencilFormat = D3DFMT_D24S8; PresentParams.Flags = D3DPRESENTFLAG_LOCKABLE_BACKBUFFER; PresentParams.FullScreen_RefreshRateInHz = g_refresh_rate_hz; PresentParams.FullScreen_PresentationInterval = D3DPRESENT_INTERVAL_IMMEDIATE; ... // Check if wide screen mode is enabled. if (g_widescreen_enabled != 0) PresentParams.Flags |= D3DPRESENTFLAG_WIDESCREEN; // Check if the video mode supports progressive scan. if (g_progressive_scan_enabled != 0) PresentParams.Flags |= D3DPRESENTFLAG_PROGRESSIVE; // Check the resolution width to see if 1080i is enabled. if (rasterizer_globals.screen_bounds.x1 == 1920) { PresentParams.Flags &= ~D3DPRESENTFLAG_PROGRESSIVE; PresentParams.Flags |= D3DPRESENTFLAG_INTERLACED; } g_pDirect3D->CreateDevice(0, D3DDEVTYPE_HAL, NULL, D3DCREATE_HARDWARE_VERTEXPROCESSING, &PresentParams, &g_pD3DDevice); ... } |
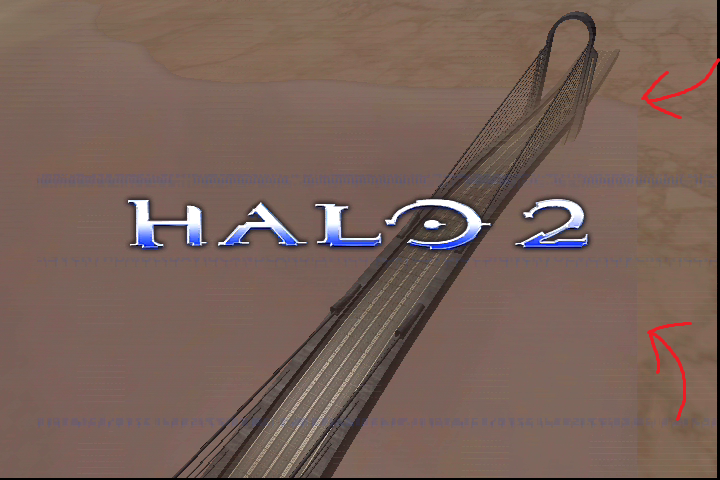
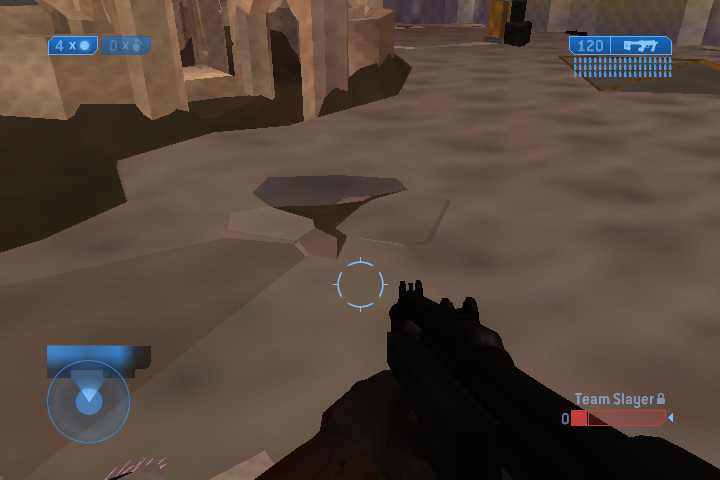
Booting up the game with these changes gives some less than pleasing results. Looking at the main menu the first thing we can see is the blue filter is now gone, and there’s some repeating line pattern strewn across the screen. Looking a bit closer and we can see part of the water geometry is also cut off, suspiciously at where the old 640 width would be compared to the new width of 720.
Making efficient use of D3D memory
The Xbox uses a unified memory architecture meaning the CPU and GPU share the same RAM. Unlike a PC there’s no concept of creating a D3D allocation in VRAM and having the GPU manage it. On Xbox the CPU can create an allocation for textures, render targets, vertex buffers, etc, and pass the allocation address directly to the GPU. This gives developers the ability to allocate one buffer and have multiple resource “views” that utilize the memory. Consider the following code which shows how to create a render target letting D3D do all the work and how to create a render target by hand:
|
1 2 3 4 5 6 7 8 9 10 11 12 13 |
// How to create a render target with D3D: IDirect3DSurface8* pRenderTarget = NULL; g_pD3DDevice->CreateRenderTarget(/* width */ 1024, /* height */ 1024, /* format */ D3DFMT_A8R8G8B8, NULL, FALSE, &pRenderTarget); // How to create a render target by hand: // Allocate and initialize the texture header. IDirect3DSurface8* pRenderTarget = (IDirect3DSurface8*)malloc(sizeof(IDirect3DSurface8)); DWORD textureSize = XGSetTextureHeader(/* width */ 1024, /* height */ 1024, /* levels */ 0, 0, /* format */ D3DFMT_A8R8G8B8, 0, pRenderTarget, 0, 0); // Allocate memory for the pixel buffer. void* pSurfaceBuffer = D3D_AllocContiguousMemory(/* size */ textureSize, /* alignment */ D3DSURFACE_ALIGNMENT); pRenderTarget->Register(pSurfaceBuffer); |
While the latter looks more messy it provides greater control to the developer and is something Halo 2 makes great use of to conserve memory for all the render targets it uses. In total Halo 2 has approximately 25 different render targets it uses but there’s only 4-5 unique buffers allocated for them which saves a lot of memory. So what does this have to do with the issues we saw in the main menu? Well if Halo 2 is creating render targets by hand it’ll need to encode the width and height of the surface into the header of the render target structure. If it’s hard coded to use 640×480 resolution it would cause issues that could result in cut off images or repeating line patterns as the pitch of the surface would not match the pitch of the back buffer. Essentially, there’s two different “views” for the same memory but the views see the memory as being of different widths which results in misplaced pixels when spanning each scan line.
Looking around the D3D/raster initialization code I found a function I called rasterizer_primary_targets_initialize that does exactly this. It takes the back, front, and depth buffers created by D3D and creates additional render targets and texture views from them, using hard coded dimensions of 640×480. Here is the C representation of the disassembly:
|
1 2 3 4 5 6 7 8 9 10 11 12 13 14 15 16 17 18 19 20 21 22 23 24 25 26 27 28 29 30 31 32 33 34 35 |
bool rasterizer_primary_targets_initialize() { // Get the back buffer, front buffer, and depth buffer surfaces. global_d3d_device->GetBackBuffer(0, D3DBACKBUFFER_TYPE_MONO, &global_d3d_surface_render_primary[0]); global_d3d_device->GetBackBuffer(-1, D3DBACKBUFFER_TYPE_MONO, &global_d3d_surface_render_primary[1]); global_d3d_device->GetDepthStencilSurface(&global_d3d_surface_render_primary_z); ... global_d3d_texture_render_primary[0] = (IDirect3DTexture8*)malloc(sizeof(IDirect3DTexture8)); global_d3d_texture_render_primary[1] = (IDirect3DTexture8*)malloc(sizeof(IDirect3DTexture8)); // Setup texture views for back/front buffers. for (int i = 0; i < 2; i++) { XGSetTextureHeader(640, 480, 1, 0, D3DFMT_LIN_A8R8G8B8, 0, global_d3d_texture_render_primary[i], global_d3d_surface_render_primary[i]->Data, 0); } // Create a render target surface for the depth buffer that matches the size and format of the back buffer. global_d3d_surface_z_as_target = (IDirect3DSurface8*)malloc(sizeof(IDirect3DSurface8)); memcpy(global_d3d_surface_z_as_target, global_d3d_surface_render_primary, sizeof(IDirect3DSurface8)); global_d3d_surface_z_as_target->Data = global_d3d_surface_render_primary_z->Data; // Create two textures for the depth buffer, one in ARGB format and one in ABGR format. global_d3d_texture_z_as_target[0] = (IDirect3DTexture8*)malloc(sizeof(IDirect3DTexture8)); XGSetTextureHeader(640, 480, 1, 0, D3DFMT_LIN_A8R8G8B8, 0, global_d3d_texture_z_as_target[0], global_d3d_surface_render_primary_z->Data, 0); global_d3d_texture_z_as_target[1] = (IDirect3DTexture8*)malloc(sizeof(IDirect3DTexture8)); XGSetTextureHeader(640, 480, 1, 0, D3DFMT_LIN_A8B8G8R8, 0, global_d3d_texture_z_as_target[1], global_d3d_surface_render_primary_z->Data, 0); ... } |
This is relatively easy to fix, we simply need to hook this function, let it run normally, and then fix up the dimensions of the textures/surfaces afterwards. The pseudo code for this hook can be seen below:
|
1 2 3 4 5 6 7 8 9 10 11 12 13 14 15 16 17 18 19 20 21 22 23 24 25 |
bool Hook_rasterizer_primary_targets_initialize() { // Call the trampoline and let the real function complete. bool result = rasterizer_primary_targets_initialize_trampoline(); // Update the dimensions of the surface/textures created to match the resolution of the back buffer. Hack_UpdateD3dPixelContainerForScreenResolution(global_d3d_texture_render_primary[0]); Hack_UpdateD3dPixelContainerForScreenResolution(global_d3d_texture_render_primary[1]); Hack_UpdateD3dPixelContainerForScreenResolution(global_d3d_texture_z_as_target[0]); Hack_UpdateD3dPixelContainerForScreenResolution(global_d3d_texture_z_as_target[1]); return result; } void Hack_UpdateD3dPixelContainerForScreenResolution(D3DBaseTexture* pResource) { // Calculate the correct pitch for the texture with tiling enabled. This can be different than the normal pitch // value and if set incorrectly will cause a "striping" effect on the back buffer. DWORD format = (pResource->Format >> 8) & 0xFF; DWORD pitch = D3D_CalcTilePitch(/* width */ rasterizer_globals.screen_bounds.x1, /* texture format */ format); // Set the new dimensions of the texture using the size of the back buffer. XGSetTextureHeader(/* width */ rasterizer_globals.screen_bounds.x1, /* height */ rasterizer_globals.screen_bounds.y1, 1, 0, format, 0, pResource, pResource->Data, pitch); } |
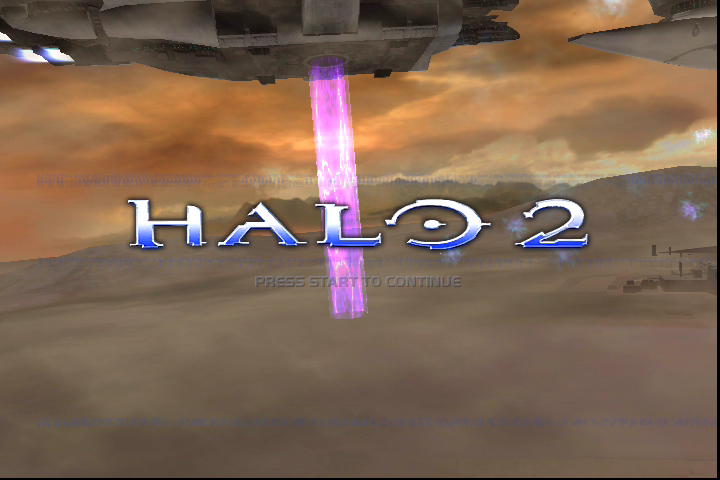
There’s one additional thing to note here and it’s that the memory used for the back, front, and depth buffers is a special type of memory known as “tiled” memory. Tiled memory stores the pixel data in a way that’s more efficient to read and write to based on the design of the actual RAM chip’s memory cells. Storing the pixel data in tiled memory decreases the overall bandwidth required when reading and writing these buffers. The gotcha here is that the pitch value for the surface/texture is not always the same as it would be for a texture in normal memory (width * bpp). This is why I call D3D_CalcTilePitch in the the Hack_UpdateD3dPixelContainerForScreenResolution helper function. It will calculate the correct pitch for tiled memory based on the width and bits per pixel for the texture format. If the pitch value is calculated incorrectly (ex: by doing width * bpp) you’ll end up getting a “striping” effect on the back buffer (which affects 1080i video resolutions specifically). If you’re curious what tiled memory looks like if you don’t “un-tile” it here you go:
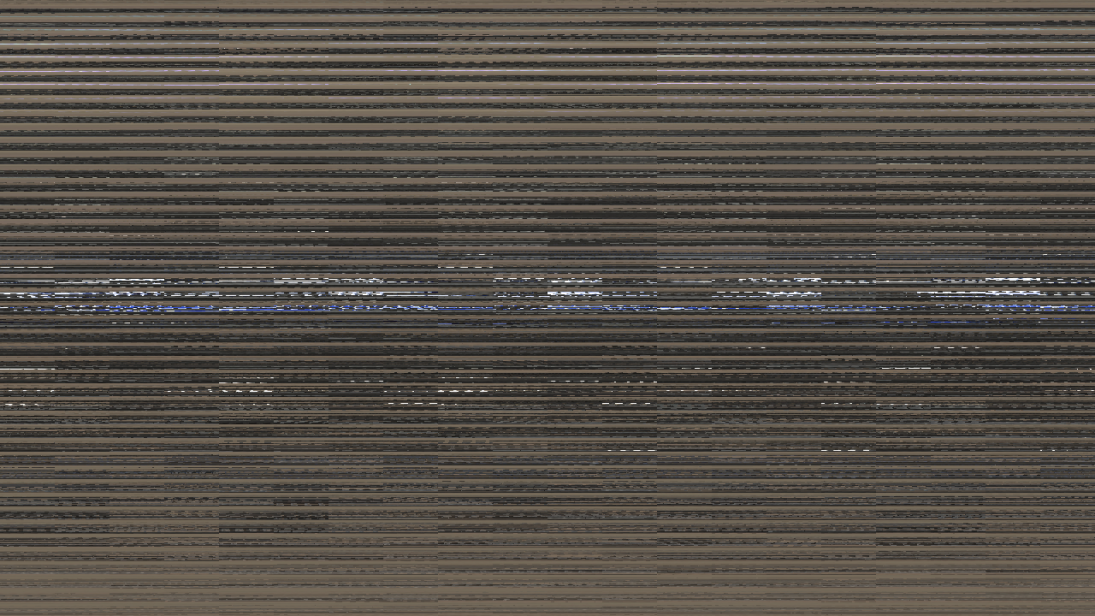
This is the main menu image from earlier (only in 720p) dumped straight from the back buffer without un-tiling the data. If you squint hard enough you can almost make out the Halo 2 logo in the center. That aside it’s time to test the new patches and see if the modifications to the surface dimensions fixed our issues. Loading up the game with this new set of modifications gives us this:
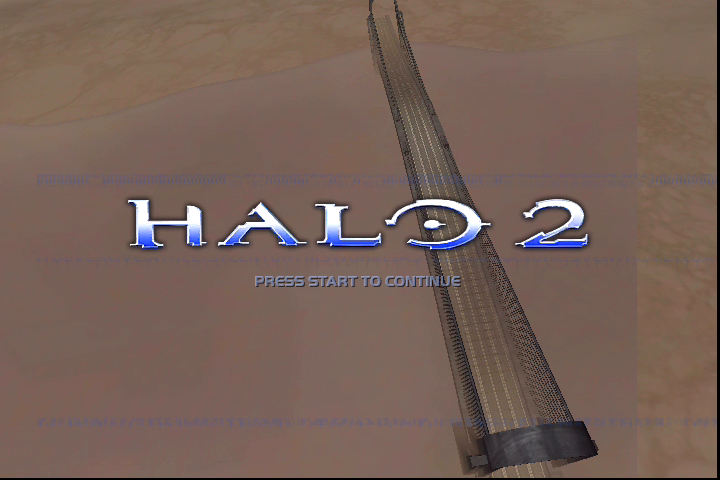
Okay so the striping effect from using the incorrect pitch value in the back/front buffer surfaces is now fixed. However, the water geometry is still cutoff even after we changed the resolutions of all the render targets/textures, right? Well we only updated the primary render targets, we still need to update the intermediate render targets used by the game’s rasterizer, and this is where having game engine specific knowledge comes in handy.
Resizing the rasterizer targets
As I mentioned earlier there’s ~25 render targets Halo 2 uses for different passes in the render loop such as detail texture blending, water, reflections, fog, shadows, etc. The game’s rasterizer system allows for creating a render target with child render targets that utilize the same underlying memory. The 25 render targets the game creates are backed by only 4-5 unique memory allocations and uses this parent/child relationship to make efficient use of the memory. When one render target is no longer in use the others are free to use that memory. While most render targets are smaller than the back buffer (ranging from 512×512 all the way down to 64×64) there’s one in particular that needs to match the back buffer resolution which is the texture accumulator target, or taxaccum for short.
The DirectX implementation on Xbox only allows for sampling from 4 textures per pixel shader pass. If you want to render something that uses more than 4 input textures you’ll need to do it in two or more passes. This is what the texaccum layer is for. Objects in the game that use more than 4 textures will first render all the detail textures to the texaccum layer. When the texaccum pass is completed the taxaccum render target will be fed into the lightmap pass as an input and combined with any additional textures for the object along with the lightmap texture to get the final output.
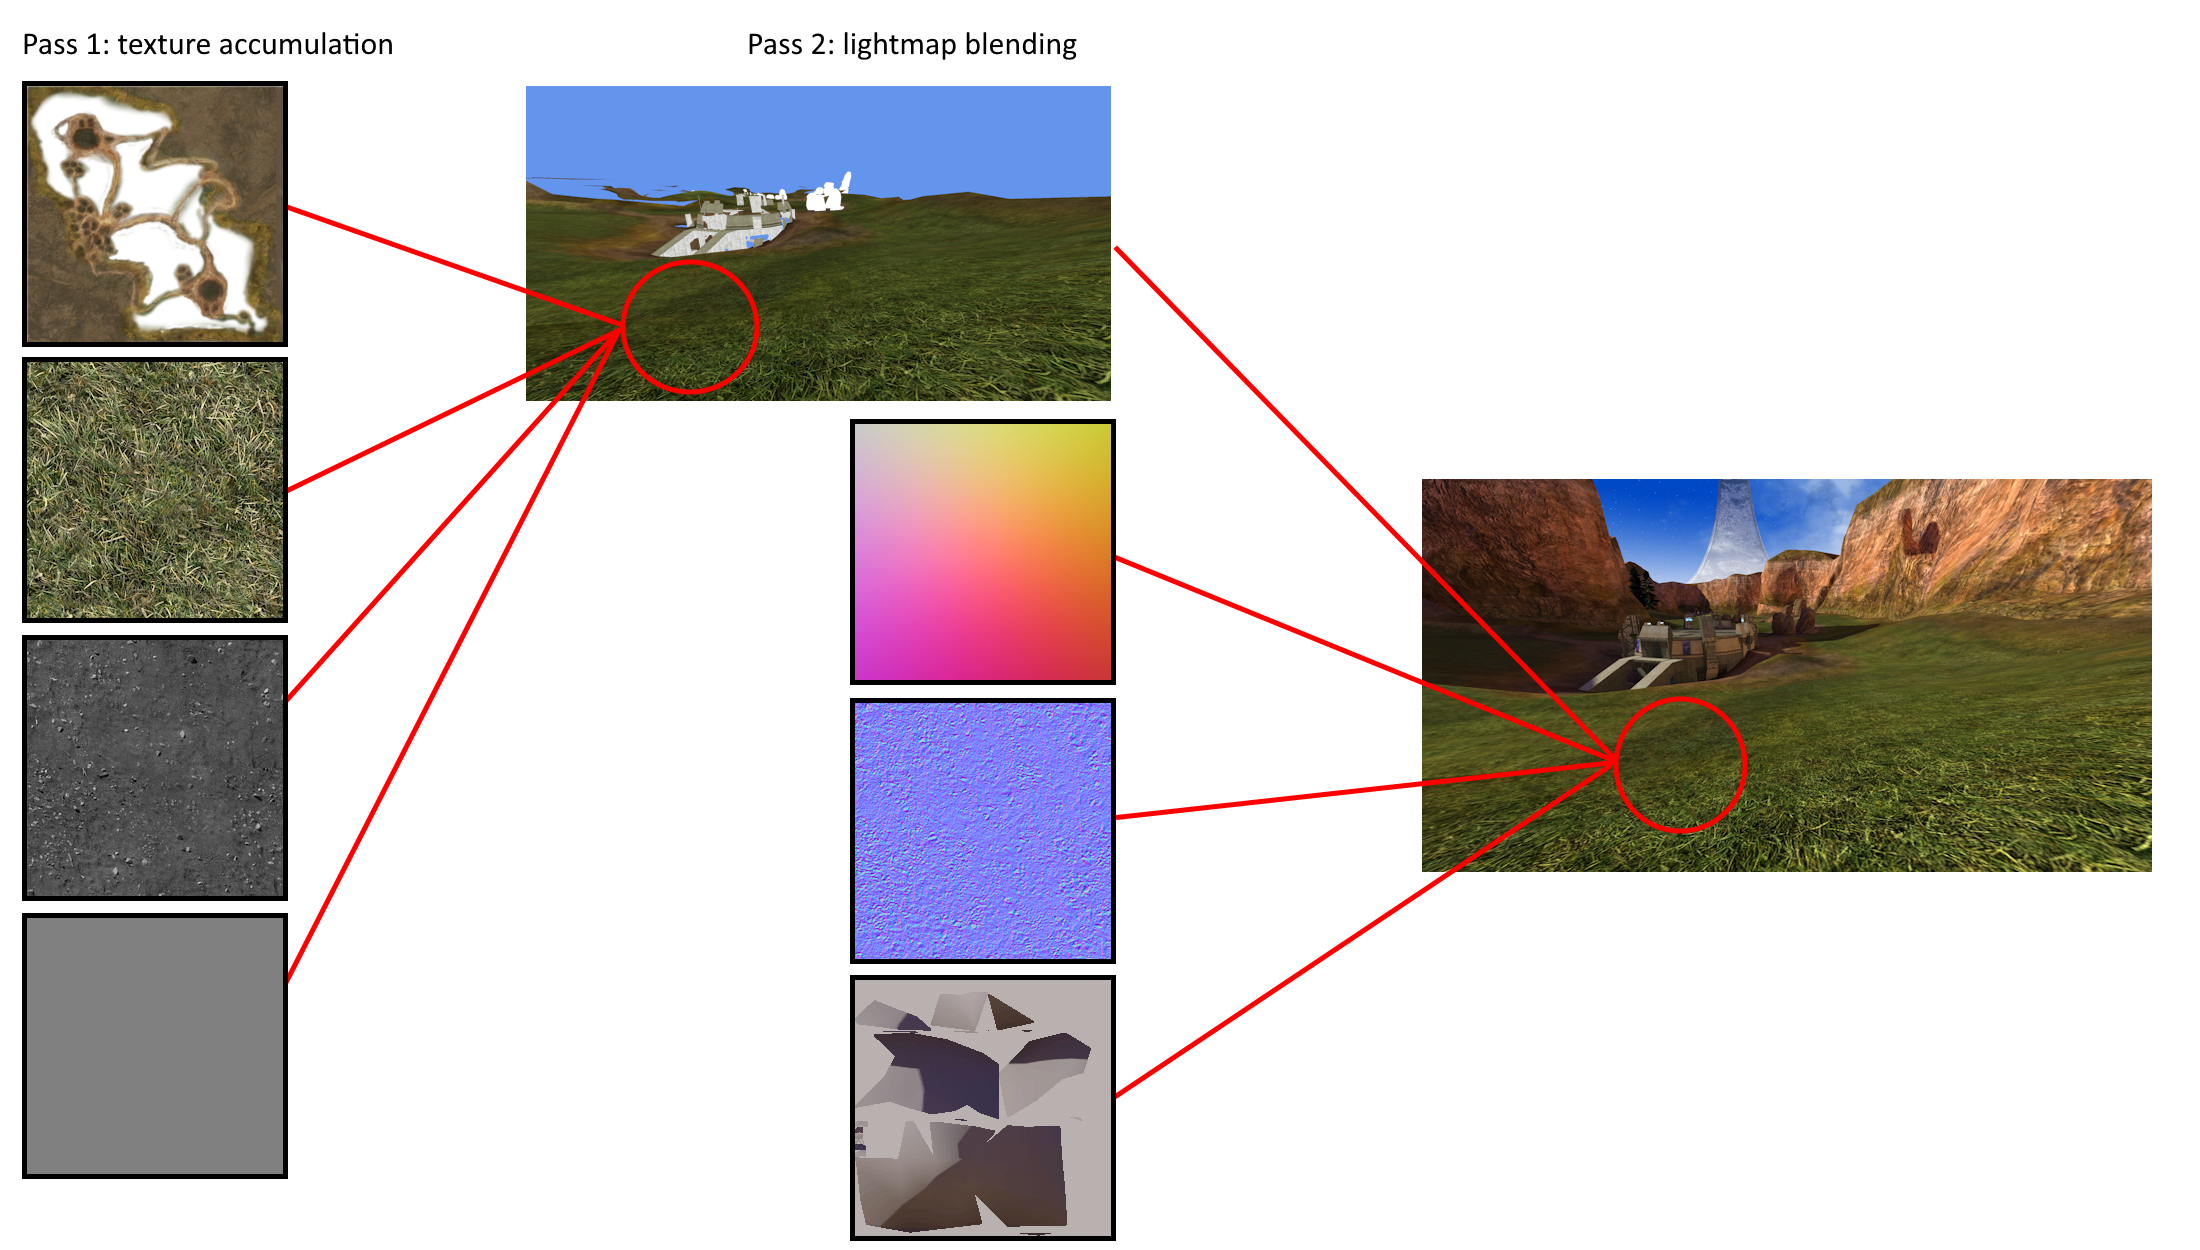
Here’s an example using the ground geometry in coagulation. In the texaccum pass the detail textures for the ground geometry are blended together into the texaccum render target. Then in the lightmap pass the texaccum render target is used as an input texture along with a bump map and lightmap texture to create the final image. The reason the water geometry in the main menu is cut off is because it’s being rendered to the texaccum render target which has a hard coded size of 640×480. Now that we’re rendering in larger video resolutions the dimensions of the texaccum target will need to be increased. Looking through the rasterizer initialization code we’ll find a function I called rasterizer_targets_initialize that allocates buffers for the various render targets and initializes them:
|
1 2 3 4 5 6 7 8 9 10 11 12 13 14 15 16 17 18 19 20 21 22 23 24 25 26 27 |
bool rasterizer_targets_initialize() { // Allocate and initialize the texaccum render target. if (!_rasterizer_alloc_and_create_render_target(1, 640, 480, 1, false)) return false; ... } bool _rasterizer_alloc_and_create_render_target(int target_index, int width, int height, int unk, bool z_surface) { // Calculate the allocation size rounded up to the nearest page size. int allocationSize = ((((width + 63) & ~64) * height * 4) + 4095) & ~4096; // Allocate memory from the game's self-managed memory pool. void* pPhysicalAllocPtr = physical_memory_globals.hi_stage_address[physical_memory_globals.current_stage] - allocationSize; if (pPhysicalAllocPtr > physical_memory_globals.low_stage_address[physical_memory_globals.current_stage]) { physical_memory_globals.hi_stage_address[physical_memory_globals.current_stage] = pPhysicalAllocPtr; // Mark the allocated memory as RW write-combine memory. pPhysicalAllocPtr |= PHYSICAL_MEM_ADDRESS_MASK; XPhysicalProtect(pPhysicalAllocPtr, allocationSize, PAGE_READWRITE | PAGE_WRITECOMBINE); } return _rasterizer_create_render_target(target_index, /* type */ 1, width, height, z_surface, /* linear */ true, true, pPhysicalAllocPtr); } |
To fix the hard coded dimensions I simply hook the _rasterizer_alloc_and_create_render_target function, check the target_index parameter for the texaccum index, and change the dimensions to match the back buffer size. The pseudo code for the hook looks like this:
|
1 2 3 4 5 6 7 8 9 10 11 12 13 |
bool Hook__rasterizer_alloc_and_create_render_target(int target_index, int width, int height, int unk, bool z_surface) { // Check the rasterizer target index and adjust the surface dimensions accordingly. if (target_index == 1) { // Texaccum rasterizer target: width = rasterizer_globals.screen_bounds.x1; height = rasterizer_globals.screen_bounds.y1; } // Call the trampoline and create the render target. return _rasterizer_alloc_and_create_render_target_trampoline(target_index, width, height, unk, z_surface); } |
Running the game with these modifications we can see the water geometry is no longer cutoff, and loading into a map doesn’t show any noticeable rendering issues:
The game looks okay in 480p but the real goal of this work is to get the game playing decently in 720p, and maybe booting in 1080p, even though it won’t play well at that resolution nor will the Xbox output a 1080p video signal (but I can still take some sweet screenshots!). We still need to fix the missing blue filter on the main menu but in the interest of keeping this post as short as possible I’m going to skip the blue filter fix as it’s not very interesting anyway (spoiler: it was just a simple size check that needed updating). Changing the video settings on my console to 720p and booting the game results in… well it results in the game crashing on startup. The reason? Due to the increased size of the front/back/depth buffers and rasterizer targets we’re out of memory, or at least, out of memory that the game is able to use.
Part 2: Memory Management and RAM Upgrades
The original Xbox had two different console types, the retail consoles that consumers would buy with 64MB of RAM, and a development console (or dev kit/debug console) that was used by game developers with 128MB of RAM. The extra RAM on the development console helped developers debug their games and run additional test code during the development process. The motherboard used by both console types is nearly identical with the main difference being the software they run and the additional RAM chips on the dev kit motherboards (they also have a slightly different south bridge for security purposes but that’s not really important here). However, retail motherboards still had the placements for the 4 additional RAM chips and over the years people found that they could solder in the missing RAM chips and run a modified Xbox kernel to give them access to the extra memory. Retail games won’t make any use of that extra memory, but homebrew applications like Xbox Media Center will use it for things like video decoding when watching movies or streaming media.
I’ve neglected to mention that up until this point the only way I was able to get the game to boot with the increased back buffer size is by running it on a console with 128MB of RAM and using an Xbox kernel with support for the additional 64MB of RAM. As-is the game will not utilize any of the additional memory, however, this kernel has additional logic to “force” certain types of memory allocations into the upper 64MB region to make space for allocations that must be in the lower 64MB region. Going into this project I already knew that the only way this game would boot in 720p would be with the RAM upgrade. In fact, the only way to get it to boot in proper 480p resolution without the RAM upgrade was to steal some memory back from the game’s in-memory texture cache which ends up causing additional texture pop-in. But all of this can be fixed by patching the game’s memory allocator to support the additional 64MB of RAM.
Halo 2’s memory management
It’s quite common for game developers to write their own memory management system, especially on older hardware where the built-in memory allocator may be slow or even buggy. Developers would use the built-in memory allocator to make a couple large allocations that they’d wrap in their own allocator to chunk it up and dish out as needed. At startup Halo 2 creates one large allocation that uses ~48.9MB of the available 64MB of RAM on the console, basically, every last page of memory they could possibly get once you account for the Xbox kernel and game executable. This region of memory is then chunked up for various subsystems in the game such as level metadata, texture, geometry, animation, and sound caches, rasterizer targets, network and simulation resources, etc.
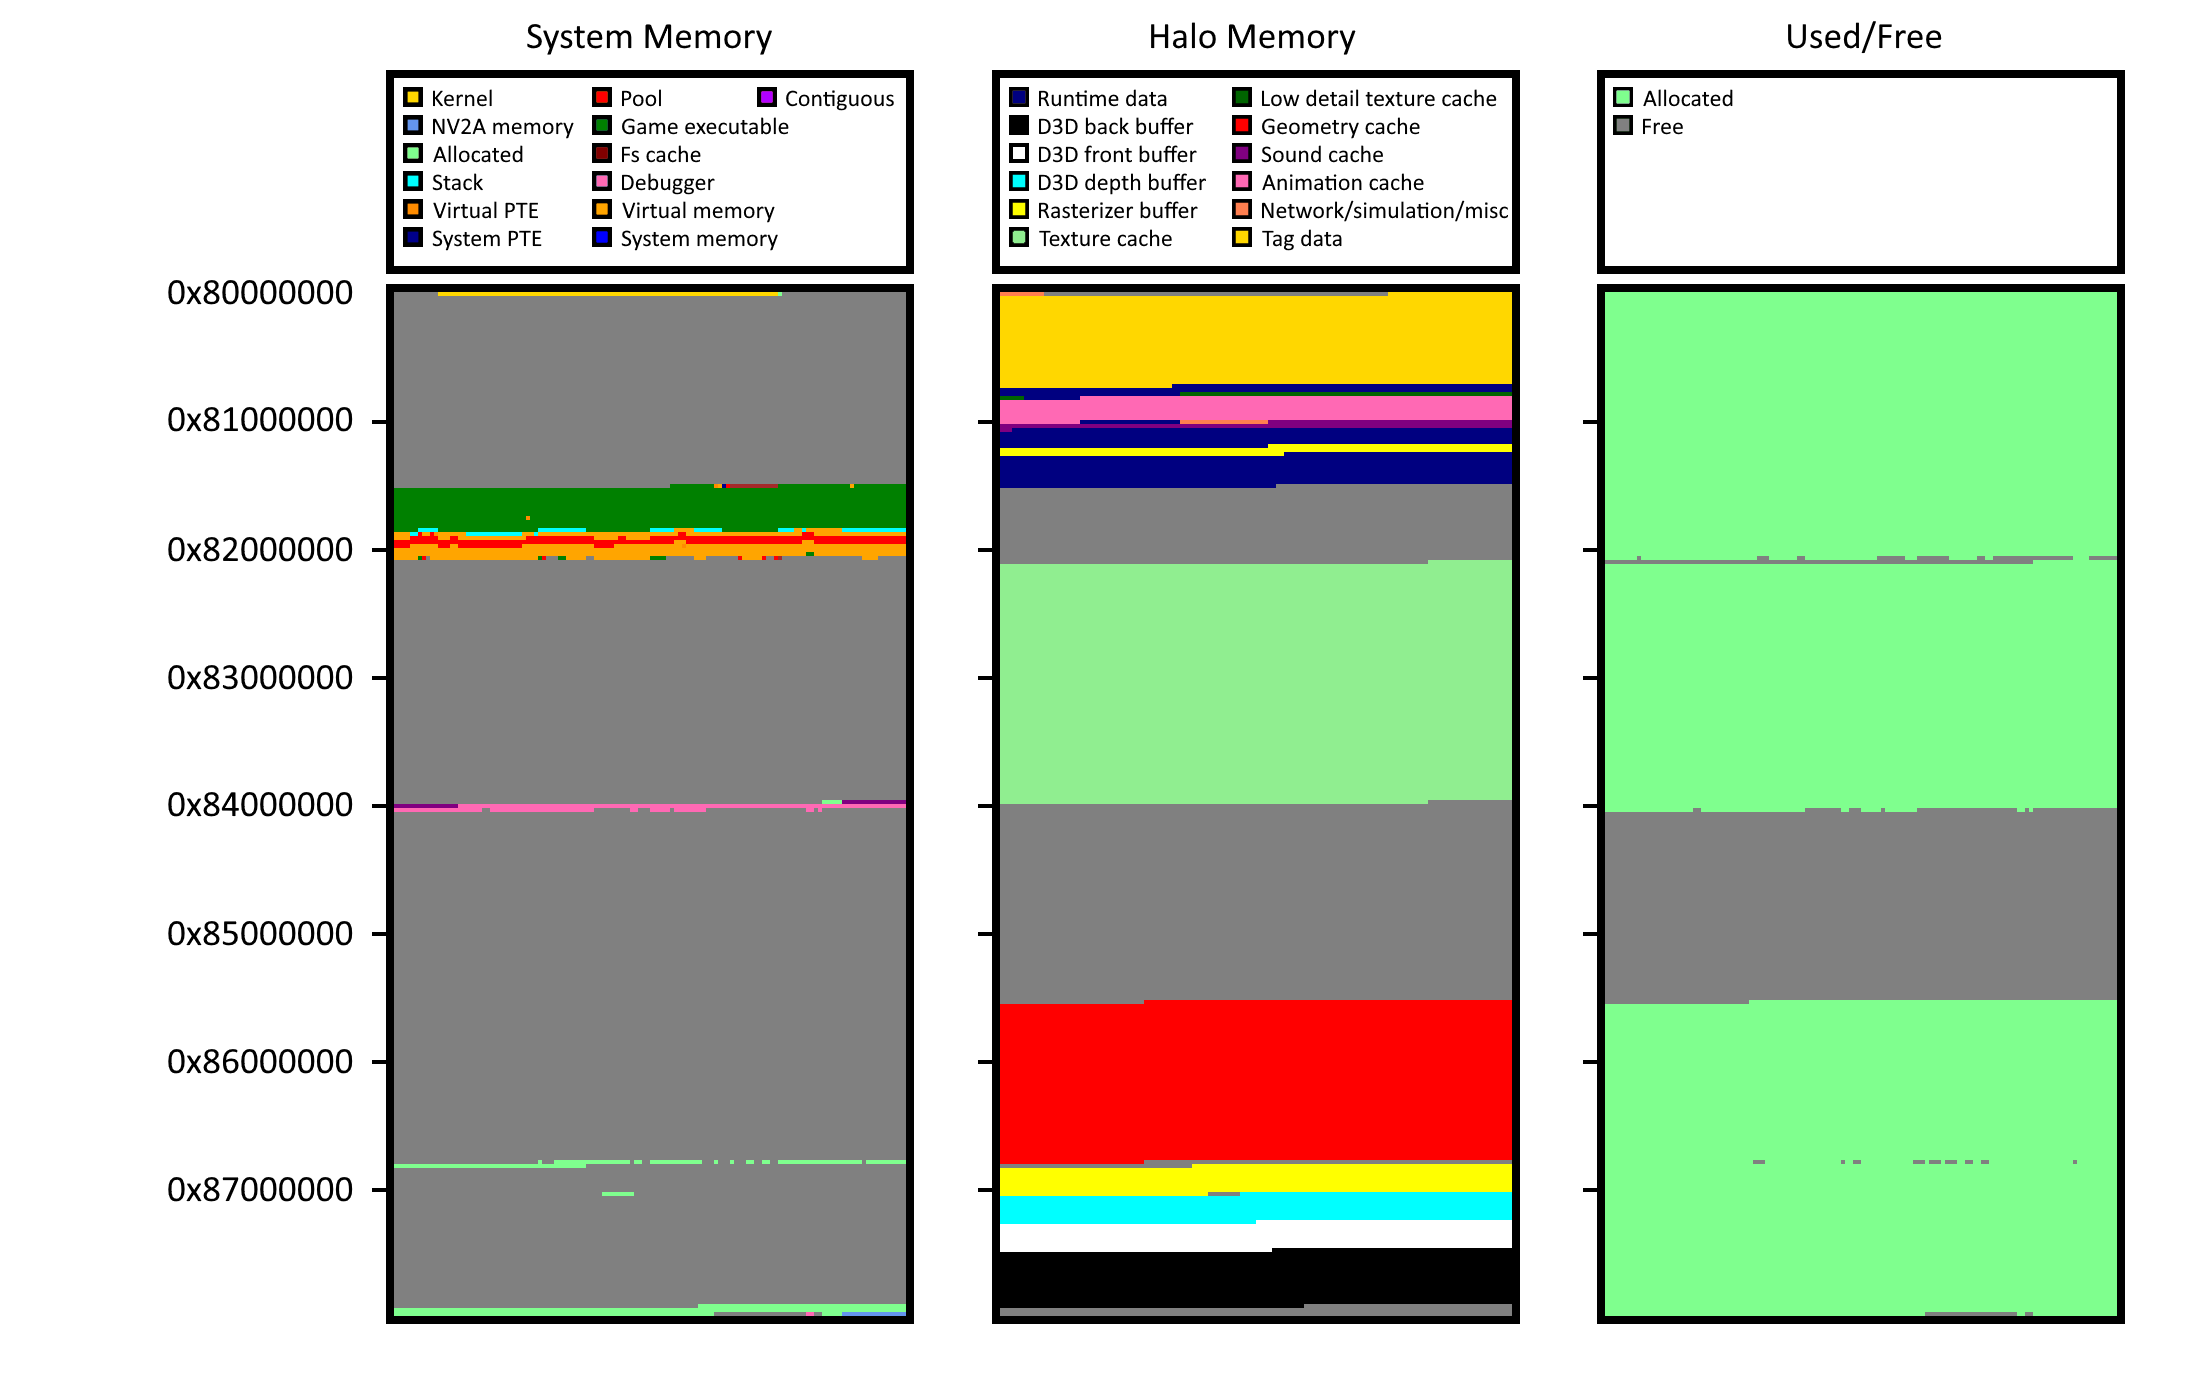
In order to patch Halo 2’s memory allocator I was going to need a way to visualize memory usage so I could see where things are located and how much space is being used. I spent a few nights working on a tool (GitHub: XboxImageGrabber) that would walk the page table entries for all the RAM on the console and create a crude bitmap that color codes various chunks of data, allowing me to create a visualization of what memory looks like:
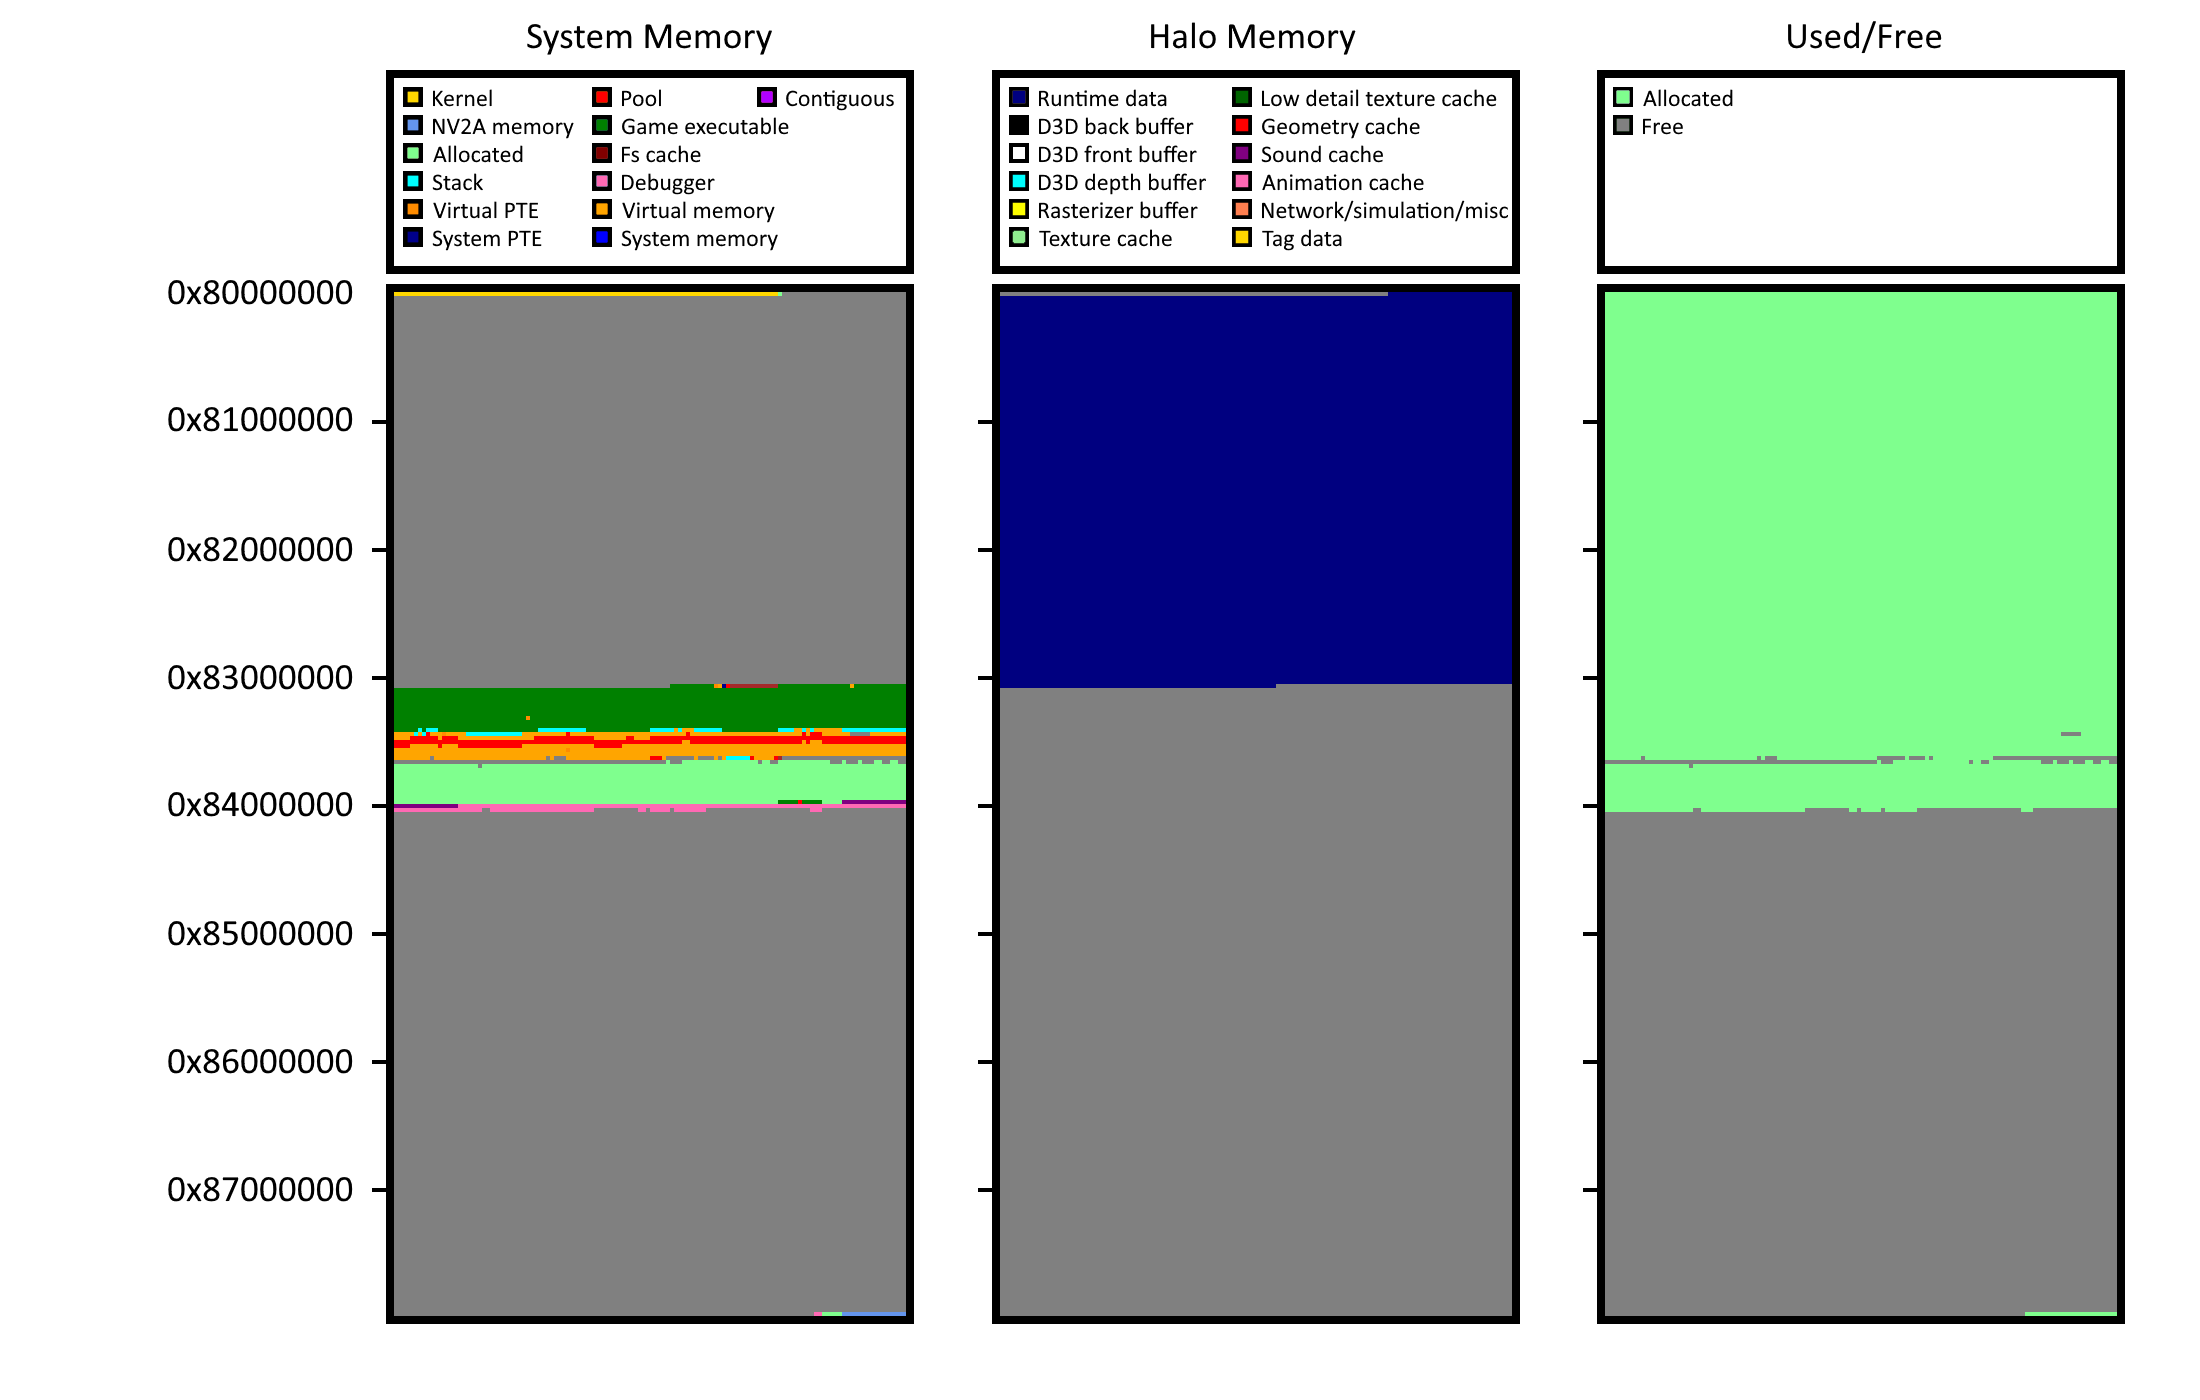
This might look like pixel barf and be hard to interpret but it was really only intended for my own use so I never bothered to make it pretty. The first column on the left shows the memory usage by the Xbox OS. At the very beginning is the Xbox kernel, down in the 0x83000000 region we have the Halo 2 executable and some virtual memory allocations, and at 0x84000000 is the end of the 64MB retail RAM region. This was taken on a console with 128MB of memory so everything after 0x84000000 is the “debug” memory region. The center column shows Halo 2’s memory usage for runtime data and d3d resources. This particular image doesn’t have color coding enabled so you can get an idea of how much memory the game reserves for this runtime data region. That blue blob? That’s the ~49MB allocation the game makes on startup. The column on the right shows combined memory usage, basically what has been allocated and what is free with no further classification for what the memory is used for. We can see that the stock version of the game uses almost every available page of memory it can get, sparing only a few as a safety net.
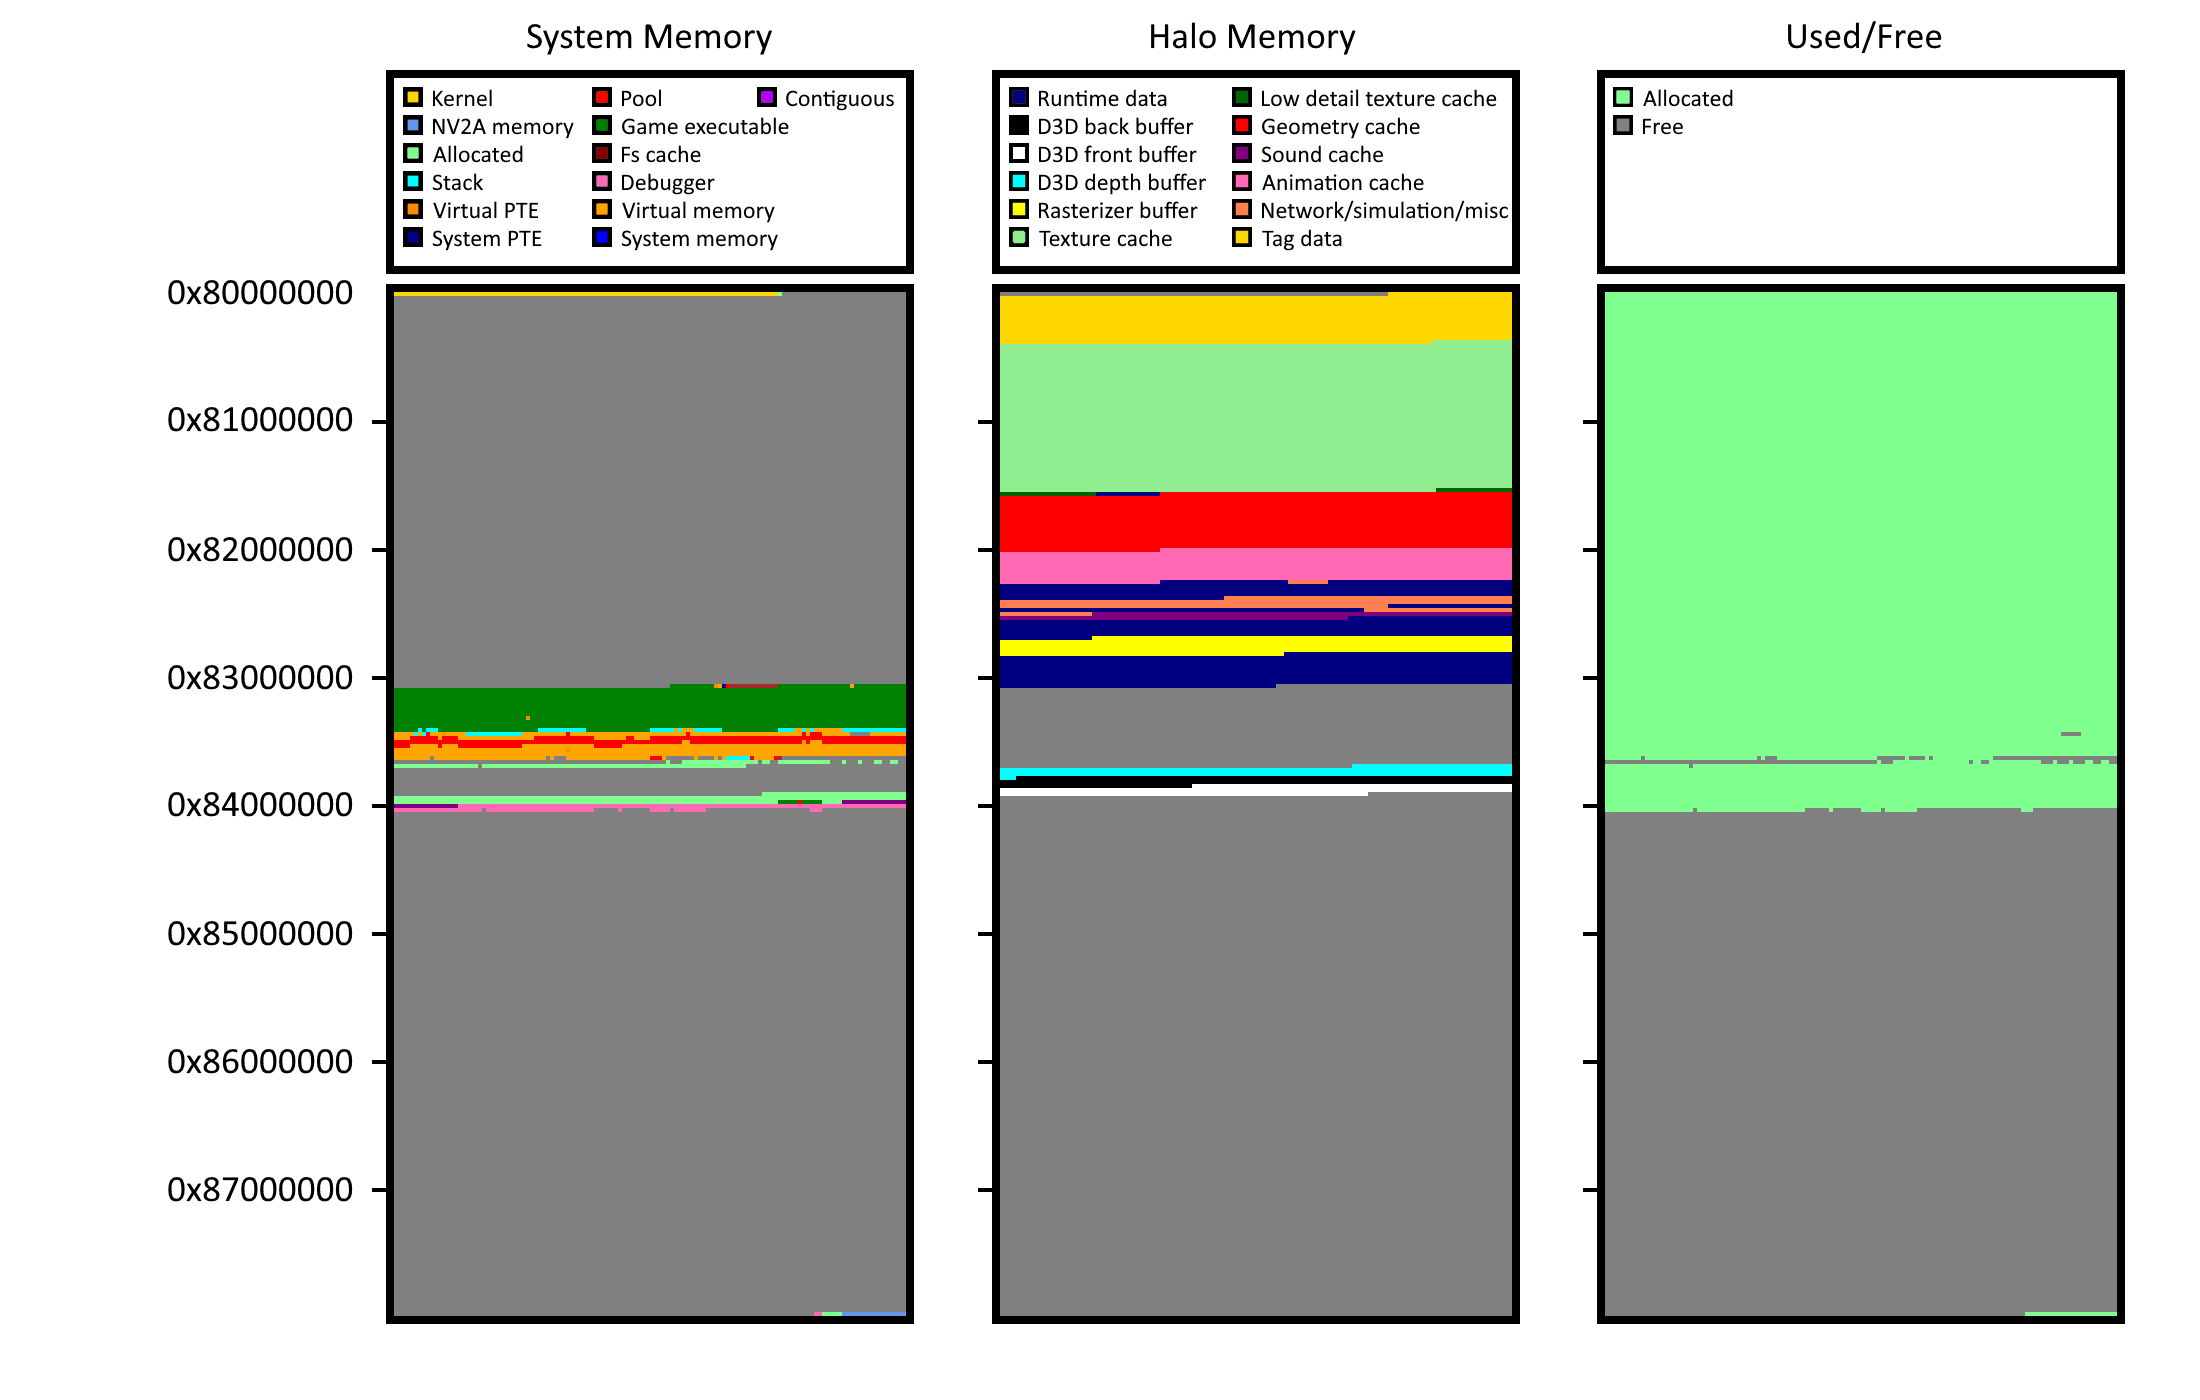
Here’s the same memory profile image with the runtime data region color coded to show the various subsystem allocations. There’s actually a few more not pictured here but they aren’t too important. The ones we’re concerned with are going to be tag data, texture cache, geometry cache, and rasterizer buffer. The runtime data allocation appearing immediately after the Xbox kernel is not a coincidence, it’s purposefully allocated at a hard coded address of 0x80061000. The “tag data” region is actually all the metadata for every object in a map file in the form of C-structs that have been serialized using the predetermined base address of 0x80061000. The tag data system is designed to be as flexible and performant as possible, and, in my opinion the inner workings are really a feat of engineering. I could write an entire blog post about the inner workings of the tag data system and why I think it makes the Blam engine one of the most flexible engines ever made, but that isn’t relevant to this post. The key takeaway here is that this data needs to always be at the same address or else the game won’t work. But all of the other data in the runtime region can be moved around at will.
Patching the memory allocator
The regions we’ll want to move out of the runtime data buffer are the rasterizer targets (at least the ones we’ll be increasing in size), and the texture and geometry caches so we can increase their size to help reduce pop-in issues. We’ll also want to reduce the size of the runtime data buffer to account for the things we’re removing so we don’t waste any memory by not filling it. The patches for the memory allocator will consist of 3 main changes:
- Hooking certain allocation calls and moving them to the debug memory region.
- When these allocations are “released” (ex: when loading a new level) we’ll need to call the appropriate free function.
- Adjusting the size of the runtime data region to reclaim memory that’s no longer being used.
I’ve called the memory allocation function we’ll need to hook physical_memory_malloc, and it’s unfortunately inlined by the compiler which means each “call site” for it will need a unique patch, and the same is true for when an allocation is free’d. The pseudo code for the memory allocator patches looks like this:
|
1 2 3 4 5 6 7 8 9 10 11 12 13 14 15 16 17 18 19 20 21 22 23 24 25 26 27 28 29 30 31 32 33 34 35 36 37 38 39 40 41 42 43 44 45 46 47 48 49 50 51 52 53 54 55 56 57 58 |
struct physical_memory_alloc_info { const char* name; // Name for the allocation, ex: "texture cache" unsigned int override_size; // If non-zero use this size for the allocation void* address; // Allocation address }; // Enum used to index into Hack_PhysicalMemoryRegionInfoTable enum { PHYS_MEM_REGION_RASTERIZER_TEXACCUM_TARGET, PHYS_MEM_REGION_GEOMETRY_CACHE, PHYS_MEM_REGION_TEXTURE_CACHE, }; // Global array of tracked allocations: physical_memory_alloc_info Hack_PhysicalMemoryRegionInfoTable[] = { { "rasterizer texaccum target", 0, NULL }, { "geometry cache", 0, NULL }, { "texture cache", 0, NULL }, }; void* Hack_PhysicalMemoryAlloc(unsigned int regionIndex, unsigned int size, int protect) { // Get a pointer to the allocation info structure. physical_memory_alloc_info* pAllocInfo = &Hack_PhysicalMemoryRegionInfoTable[regionIndex]; // If the override size is specified use it for the allocation. if (pAllocInfo->override_size != 0) size = pAllocInfo->override_size; // Round the size up to the nearest page interval. size = (size + PAGE_SIZE-1) & ~(PAGE_SIZE-1); // TODO: Allocate memory from the debug region... pAllocInfo->address = NULL; if (pAllocInfo->address == NULL) DebugBreak(); // Debug print the allocation info. DbgPrint("physical_memory_malloc %s %ld at 0x%08x\n", pAllocInfo->name, size, pAllocInfo->address); return pAllocInfo->address; } void Hack_PhysicalMemoryFree(unsigned int regionIndex) { // Get a pointer to the allocation info structure. physical_memory_alloc_info* pAllocInfo = &Hack_PhysicalMemoryRegionInfoTable[regionIndex]; // If the allocation is valid free it. if (pAllocInfo->address != NULL) { // TODO: Free the allocation... pAllocInfo->address = NULL; } } |
This allows me to hook individual call sites where the physical_memory_malloc function is inlined using a patch like so:
|
1 2 3 4 5 6 7 8 9 |
push 404h ; PAGE_WRITECOMBINE | PAGE_READWRITE push ecx ; size, calculated earlier in function push PHYS_MEM_REGION_GEOMETRY_CACHE ; regionIndex mov eax, Hack_PhysicalMemoryAlloc call eax ; Call our helper function to perform the allocation ; Jump over code we no longer need to execute. push 0012DA73h ret |
Now you’re probably wondering why the lines that perform the allocation and free calls in the pseudo code above are labeled as “TODO”, and that’s because allocating physical contiguous memory in the debug memory region is problematic…
Xbox memory architecture
Earlier I mentioned that the original Xbox uses a unified memory design allowing the CPU and GPU to share the same RAM. When the CPU provides a memory address to the GPU (ex: address of a texture or vertex buffer) it must use a physical memory address and the memory span must be contiguous (meaning the pages backing the allocation are all consecutive with no gaps). This is because the GPU doesn’t have any concept of page tables or virtual memory addresses so it’s unable to translate virtual addresses to perform memory accesses. It simply treats the memory address as an offset from the start of RAM and reads data as needed starting from this offset. There’s specific APIs for allocating “video” or “GPU” memory but these are all wrappers for allocating memory that is physical and contiguous.
The Xbox kernel provides various functions for allocating memory but there’s two main types of memory allocations that can be made. Physical memory which is also contiguous, and virtual memory which is not explicitly contiguous (it can end up being contiguous by chance but it’s virtual memory so it’s not required to be contiguous). On an unmodified retail Xbox console there’s only 64MB of RAM and the entire 64MB region can be used to make physical or virtual allocations. When using a console with 128MB of RAM and kernel with extra RAM support only the first 64MB of RAM can be used for physical allocations, but virtual allocations can be made anywhere in the 128MB region. If you try to make a physical allocation and there’s not enough free contiguous memory in the first 64MB of RAM, the kernel will attempt to relocate virtual allocations into the upper 64MB region to satisfy the allocation request.
This was done on purpose to provide a closer experience to the retail hardware for developers to work with. The additional 64MB of “debug” memory was to allow developers to run extra code and profiling tools that consumed memory without having to take away from the memory their game would normally have. There’s no benefit to allowing developers to allocate more “video” memory in the debug region as it doesn’t exist on retail hardware and can’t be used in a final version of the game. However, this limits me in terms of how much additional memory I can give Halo 2 for video allocations.
Hot patching the Xbox kernel
Looking at the memory profile image above we can see the “runtime data region” consumes most of the first 64MB of RAM. Not everything allocated in this region is required to be “video” memory (and thus needs to be in physical memory), so I could move as many things as possible out of that region and into the upper 64MB of RAM as a virtual allocation. But this gets quite messy to track down all of the allocations being made and patch each call site, and it won’t give us as much memory as we really need for additional performance tweaks later on. Rather than go for a sub-par solution I decided to take matters (or memory) into my own hands and try something crazy.
I ran some tests where I made a video memory allocation “by hand” and just stole some unused page table entries for the upper 64MB address space. Instead of asking the kernel to allocate the memory for me, I just “commandeered” the page tables and did it myself. Feeding this address to the GPU for rendering worked just fine which meant that the limitation of only being able to allocate “video” memory in the lower 64MB of RAM is not a hardware limitation it’s a software one. The only thing preventing me from making physical memory allocations in the upper 64MB of RAM is the kernel. After spending a few nights digging through the memory management functions in the Xbox kernel I found the blocker that was preventing me from making physical allocations passed the 64MB mark:
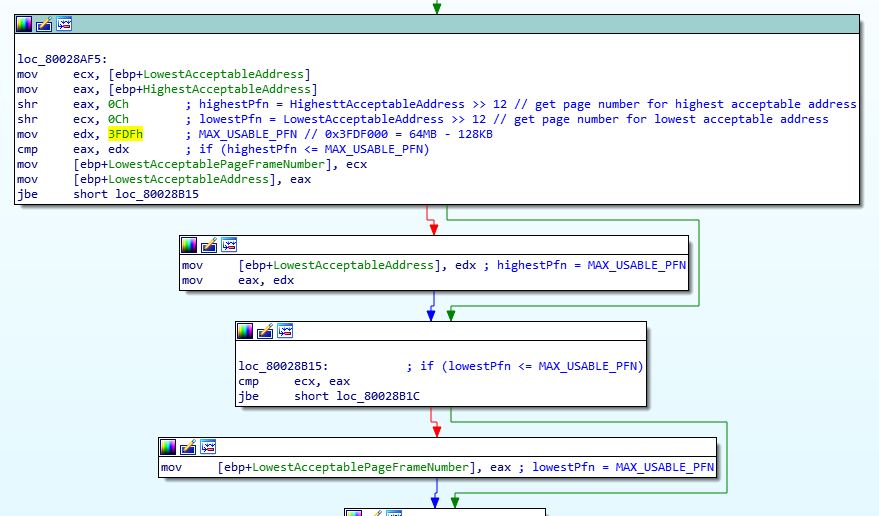
The MmAllocateContiguousMemoryEx function used to allocate contiguous physical memory takes in two parameters that let the caller specify the lowest and highest acceptable addresses for the memory allocation. This is how Halo 2 gets the runtime data region to always be at the address 0x80061000, by specifying the highest acceptable address as 0x61000 (the upper most bits are masked out). The kernel takes both of these parameters and converts them into page frame numbers (basically an index for the page of memory that corresponds to that address), and checks they’re less than or equal to this constant I called MAX_USABLE_PFN. The MAX_USABLE_PFN constant corresponds to the address 0x83FE0000, which is equal to 64MB – 128KB. What is the significance of this value? The top 128kb of RAM is always reserved with 64KB used as a “scratch” region for the GPU and the other 64KB used for the CPU page tables. I believe the GPU “scratch” region is used for storing data related to depth buffer compression tags and possibly processed vertex data that is still passing through the shader pipeline, but I’ve never actually confirmed this myself.
This check is our blocker for allocating physical memory in the upper 64MB of RAM. I changed this value at runtime after my test application loaded and confirmed I was able to allocate memory in the upper 64MB of RAM using MmAllocateContiguousMemoryEx, and the GPU was able to use that memory just fine. So now all I needed to do is write a function to hot patch the Xbox kernel when the game boots, no big deal right? For this patch I’ll first make sure the console has 128MB of RAM installed, then resolve the address of the MmAllocateContiguousMemoryEx function, search for the “mov edx, 0x3FDF” instruction, and patch it to use a new “MAX_USABLE_PFN” value suitable for 128MB RAM configuration. Here’s the pseudo code for the patch:
|
1 2 3 4 5 6 7 8 9 10 11 12 13 14 15 16 17 18 19 20 21 22 23 24 25 26 27 28 29 30 31 32 33 34 35 36 37 38 39 40 41 |
bool PatchMaxPFN() { // Search for the max PFN value. BYTE* pPtr = (BYTE*)pMmAllocateContiguousMemoryEx; BYTE* pEndPtr = (BYTE*)pMmAllocateContiguousMemoryEx + 0x80; while (pPtr < pEndPtr) { // Check for the max PFN value. if (*(DWORD*)pPtr == 0x00003FDF) { _asm { // Disable write protect. pushf cli // Disable interrupts mov eax, cr0 // Get the control register value push eax // Save it for later and eax, 0xFFFEFFFF // Disable write-protect mov cr0, eax // Update the max PFN to use the 128MB limit value. mov eax, pPtr mov dword ptr [eax], 0x00007FCF // Re-enable write-protect. pop eax mov cr0, eax // Re-enable write-protect popf } return true; } // Next round. pPtr++; } // Failed to patch max PFN value. return false; } |
Now that the memory allocation problems are solved we can fill in the two missing lines from the Hack_PhysicalMemoryAlloc/Hack_PhysicalMemoryFree functions above to use MmAllocateContiguousMemoryEx and MmFreeContiguousMemory. Once we hot patch the kernel we can call MmAllocateContiguousMemoryEx using a lowest acceptable address of 0 and highest acceptable address of 0xFFFFFFFF (which the function will override with our new MAX_USABLE_PFN value). The kernel will walk the page tables in reverse starting from the highest acceptable page number and search for a span of free pages large enough to satisfy the allocation request. This will guarantee the upper 64MB of RAM will take preference during allocation but allows using any available space in all 128MB of RAM to satisfy the request.
|
1 2 3 4 5 6 7 8 9 10 11 12 13 14 15 16 17 18 19 20 21 22 23 24 25 26 27 28 29 30 31 32 33 34 35 36 |
void* Hack_PhysicalMemoryAlloc(unsigned int regionIndex, unsigned int size, int protect) { // Get a pointer to the allocation info structure. physical_memory_alloc_info* pAllocInfo = &Hack_PhysicalMemoryRegionInfoTable[regionIndex]; // If the override size is specified use it for the allocation. if (pAllocInfo->override_size != 0) size = pAllocInfo->override_size; // Round the size up to the nearest page interval. size = (size + PAGE_SIZE-1) & ~(PAGE_SIZE-1); // Allocate physical contiguous memory (using the entire 128MB address space). pAllocInfo->address = MmAllocateContiguousMemoryEx(size, /* LowestAcceptableAddress */ 0, /* HighestAcceptableAddress */ 0xFFFFFFFF, /* Alignment */ PAGE_SIZE, /* PageAccess */ protect); if (pAllocInfo->address == NULL) DebugBreak(); // Debug print the allocation info. DbgPrint("physical_memory_malloc %s %ld at 0x%08x\n", pAllocInfo->name, size, pAllocInfo->address); return pAllocInfo->address; } void Hack_PhysicalMemoryFree(unsigned int regionIndex) { // Get a pointer to the allocation info structure. physical_memory_alloc_info* pAllocInfo = &Hack_PhysicalMemoryRegionInfoTable[regionIndex]; // If the allocation is valid free it. if (pAllocInfo->address != NULL) { // Free the allocation. MmFreeContiguousMemory(pAllocInfo->address); pAllocInfo->address = NULL; } } |
Visualizing the results
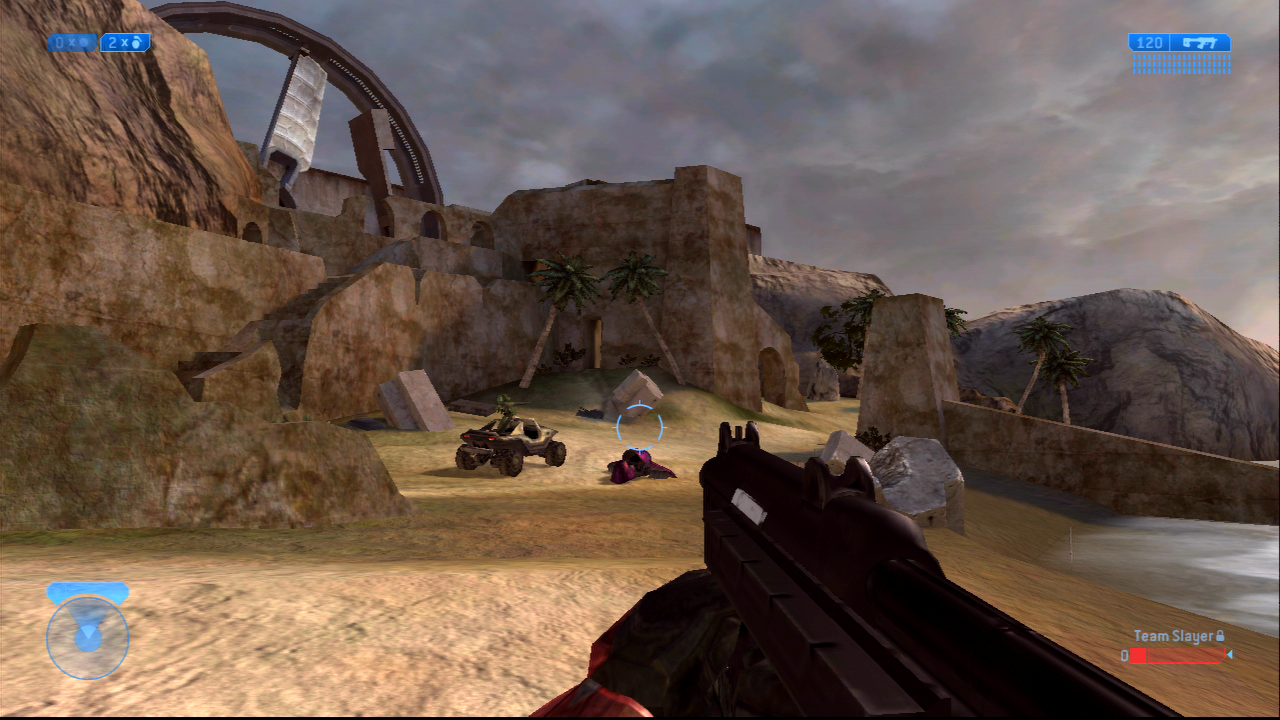
That was a lot of work but the results are well worth it. As I mentioned earlier the only way to get the game to run in 720p or higher is with a RAM upgrade. Even running the game in proper 480p on a console without the RAM upgrade requires stealing memory back from the game to offset the additional memory requirements, which exacerbates the texture pop-in issues that are prevalent even in the game’s unmodified form. I’ve rambled on about memory management enough, here’s what the game looks like in 720p:
It looks great! But it doesn’t play great… The FPS is noticeably lower to the point where it’s dipping to 10 FPS or lower in heavy scenes. While I was expecting a performance hit I wasn’t expecting it to be this bad, but that’s okay because there’s things we can do to improve this quite a bit. Before that, lets give 1080p a try and see what it looks like. Remember that while the game is rendering natively in 1080p the Xbox console is only able to output a 1080i video signal. However, by dumping the D3D back buffer directly I’m able to get a proper 1080p screenshot before the GPU converts it into half frames for the video encoder to display on screen:
Unforeseen consequences
Okay so this kernel hot patching does have some undesirable side effects which is understandable since I just changed a pretty crucial aspect of how memory management works mid-execution. Hot patching the kernel and letting Halo 2 run works fine until you exit the game without cold rebooting the console. If you do a warm reboot (returning to the dashboard, ejecting the dvd tray, etc) the console is basically “hosed” and the next application/game to run will have severe graphical artifacting, and the console will most likely crash shortly after. This is likely because there’s more changes required to expand the physical memory region outside of the single change I made. I have some theories as to what the remaining issues are but having spent a significant amount of time on memory management patches I decided to take the cop out solution here. To make this more “robust” I added additional patches that would cold reboot the console (which reloads the kernel) whenever you exit the game so all of the side effects of this hot patching are hidden from the end user. This would prove useful later on as there’s additional changes I make that really should be reset after exiting the game and cold rebooting the console solves all of this.
Part 3: Performance Improvements and Overclocking
Now that the game is rendering in 720p and 1080p it’s time to address the performance issues and make it playable, at least in 720p. Adding 1080p support is really just a bonus to get nice screenshots and I have no expectations that the console will be able to run the game at that resolution and be “playable”, regardless of what performance improvements I can make. The first step was to get some baseline performance measurements on a stock Xbox console and the god box that doom sent me. The god box also had two different BIOS images, one that overclocked just the CPU, and one that overclocked both CPU and GPU. This would let me get three different measurements: one for stock hardware (no overclocking), one for CPU overclocking, and one for CPU + GPU overclocking. From these measurements I could determine where the performance bottlenecks were and start from there.
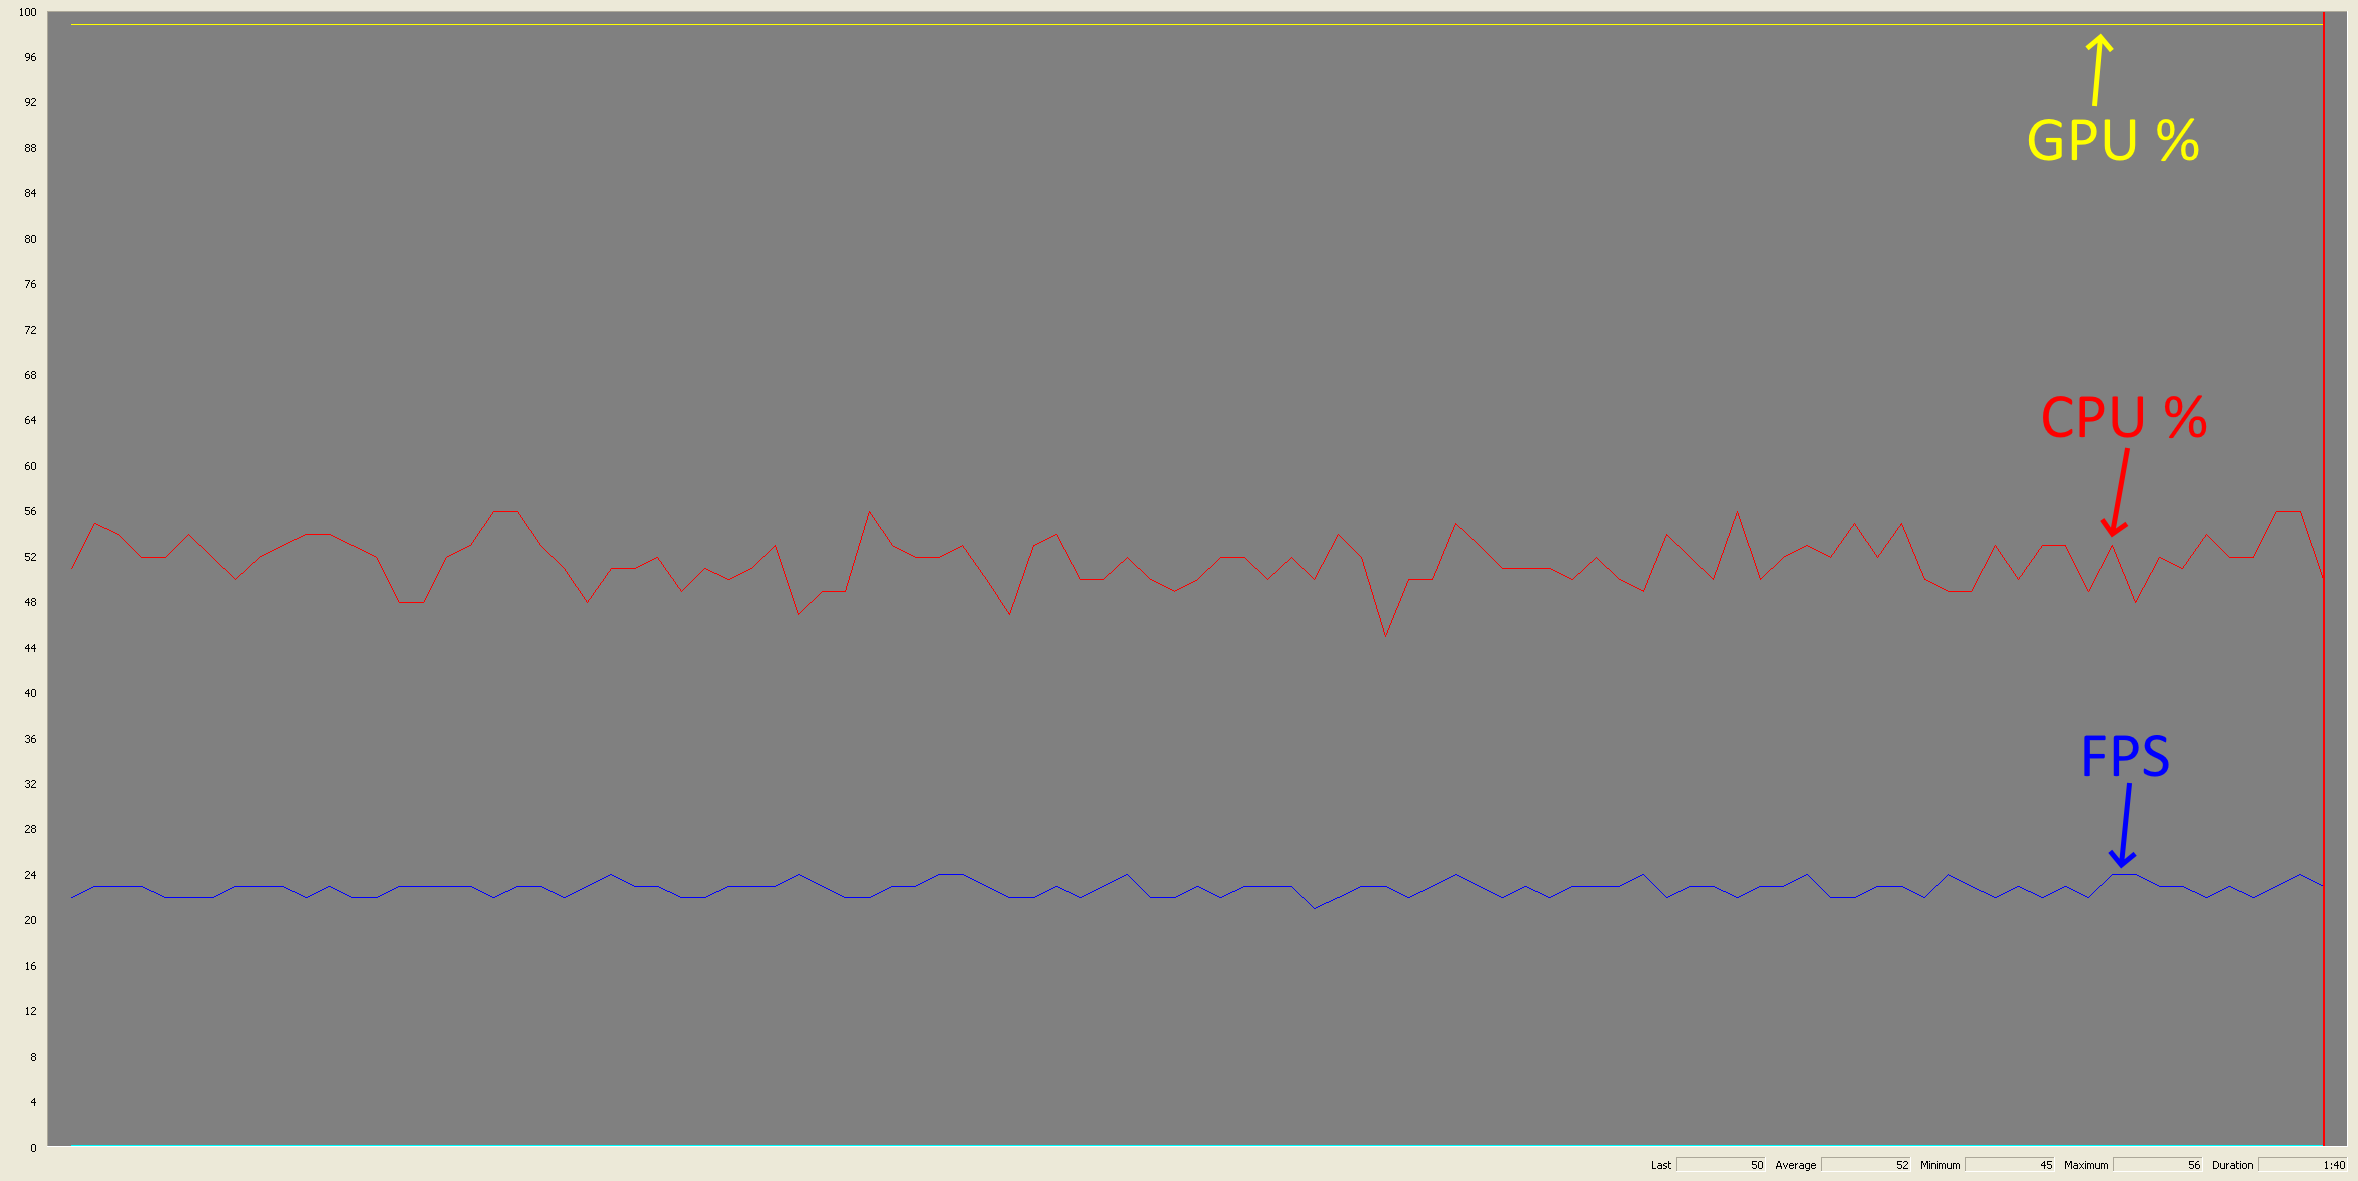
I found a particularly heavy area on Zanzibar that I’ll refer to as the “zanzibar benchmark scene”, which was a decent test case for performance benchmarks. While collecting the performance measurements I immediately realized that the FPS between all three setups was almost identical when under heavy load which was extremely suspicious. If overclocking the CPU and GPU show no improvement in performance then the bottleneck was certainly elsewhere. My first thought was I might be maxing the memory bandwidth now that the GPU has a lot more pixel calculations to do and thus a lot more memory to read and write. However, after spending a few nights running tests and bouncing ideas off doom I realized I’d overlooked something very obvious while staring at a performance graph.
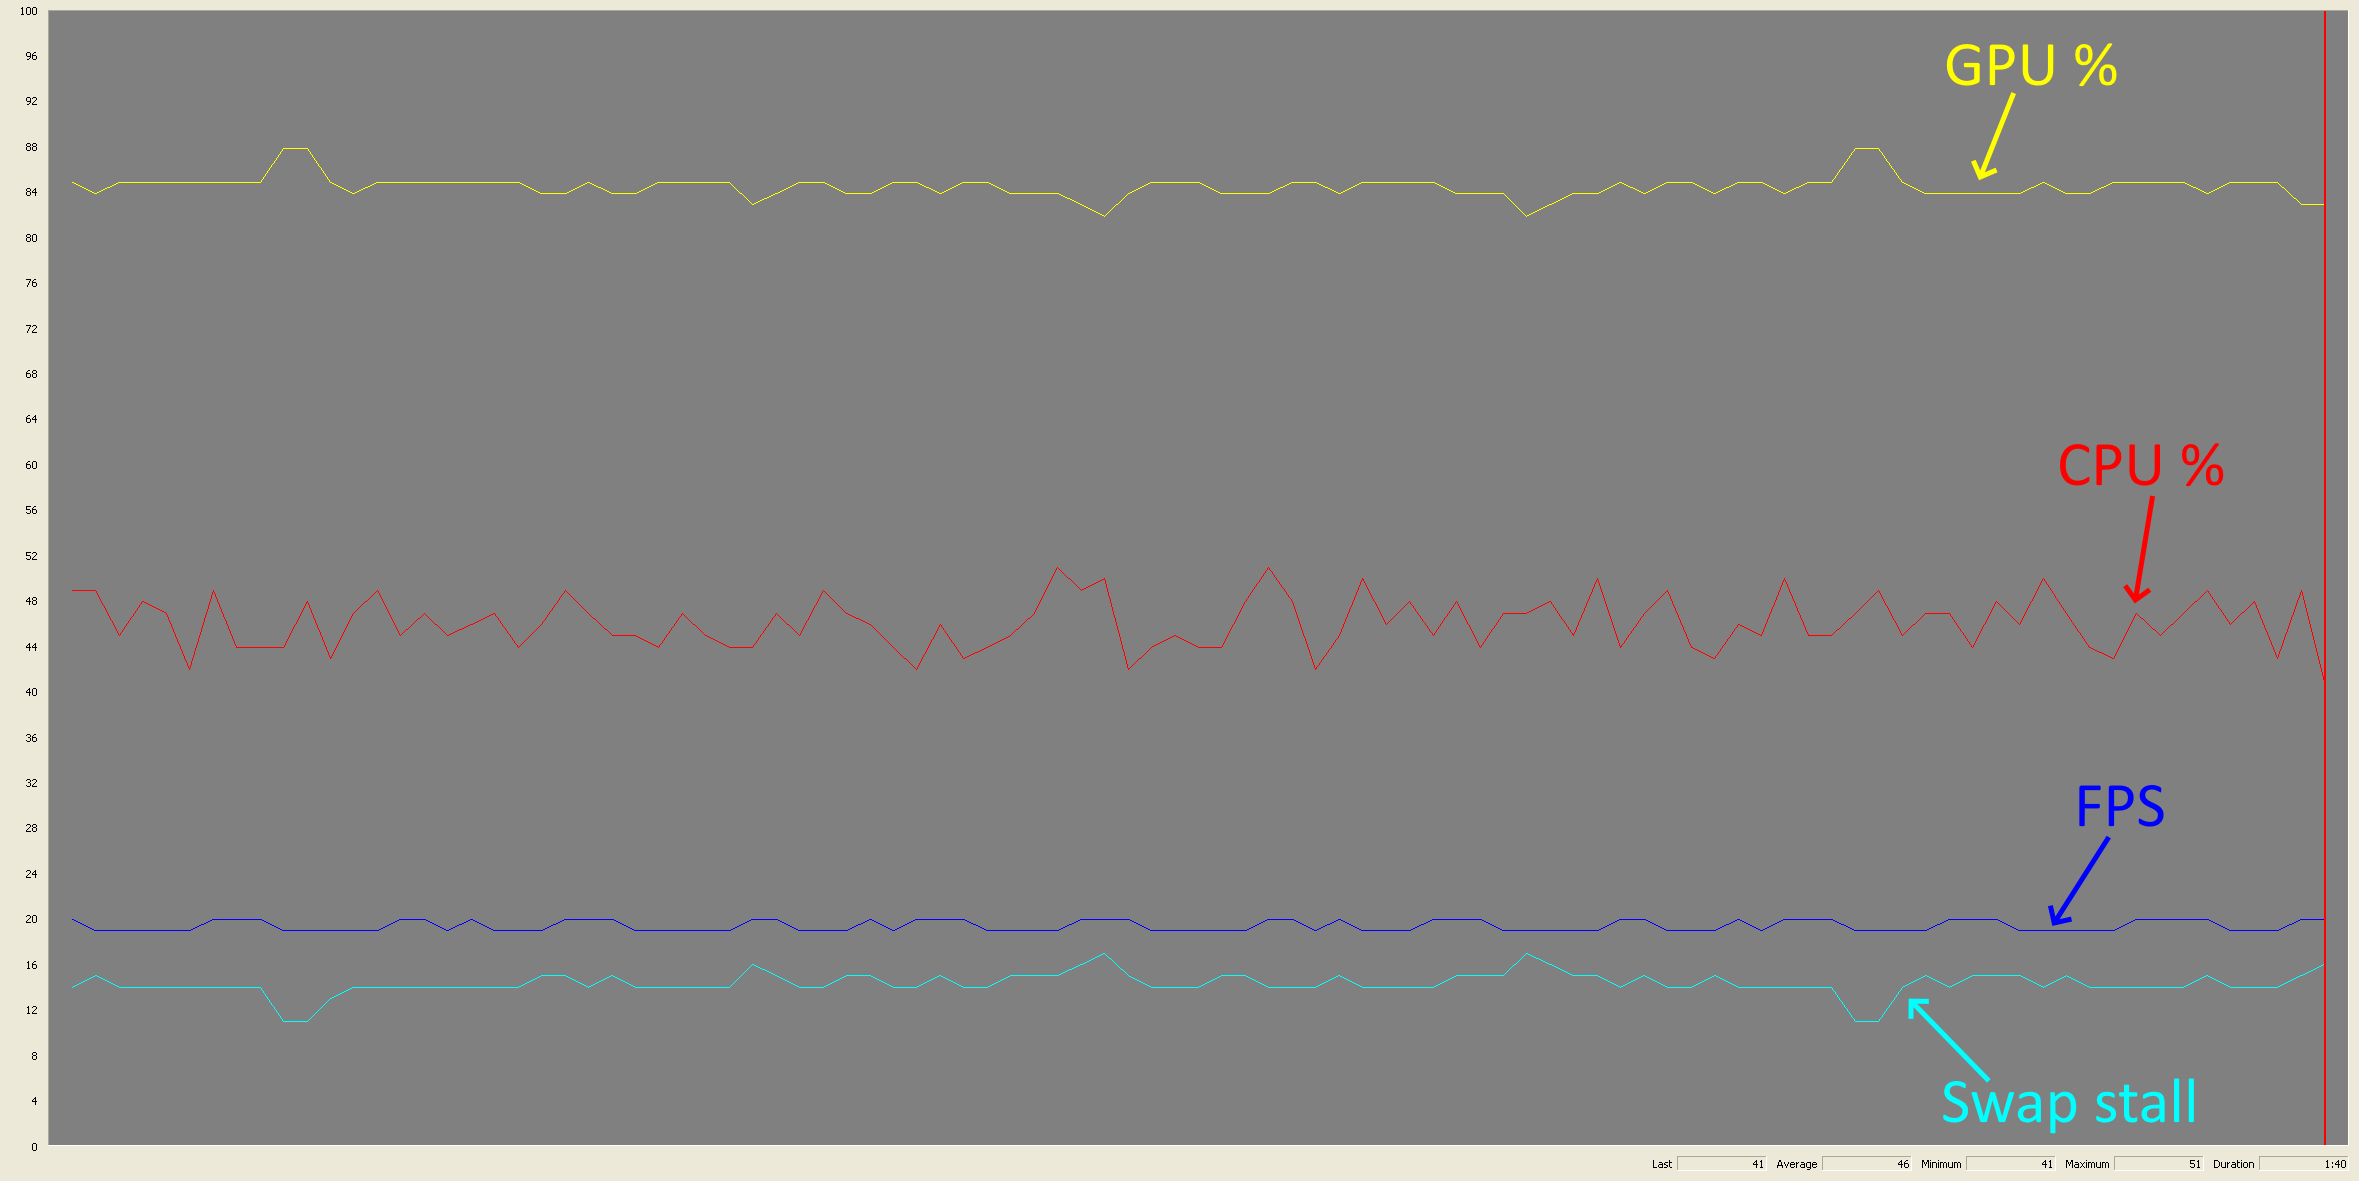
This graph shows GPU use (yellow), CPU use (red), frames per second (blue), and swap stall rate (teal). Initially I didn’t know what “swap stall” was and I couldn’t find any documentation about it in the Xbox SDK docs. But after I realized the game was running with vsync on it made perfect sense, swap stall = swap chain stall, the GPU was stalling because the swap chain was full and vsync was on.
VSync and swap chains
Halo 2 runs with vsync on and uses double buffering so it only has 2 buffers in the swap chain (one front buffer and one back buffer). The back buffer is used by the GPU to render the current frame while the front buffer is the previous frame that was rendered and is now being displayed on screen. When the GPU finishes drawing the current frame it needs to swap the back and front buffers (or rotate the swap chain) so the newly completed frame can be drawn on screen and the old one can be used by the GPU for the next frame. But when vsync is on the GPU can only rotate the swap chain at the start of a vertical blanking (vblank) period (when the TV retraces to the top and starts drawing the image from the beginning). If you turn vsync off the GPU can rotate the swap chain at any time, but if the front buffer is only partially displayed on screen when you rotate the swap chain it’ll result in a “tearing” effect on screen (hence why you want vsync on as it prevents this).
The swap stall line in the graph above is the rate at which the GPU had to stall and wait for a vblank period in order to rotate the swap chain. Basically, the GPU isn’t able to render frames fast enough to keep up with the refresh rate of the screen and it ends up having to wait until the next screen refresh to rotate the swap chain. In hindsight this seems so obvious but at the time I was preoccupied with all the hardware modifications I completely forgot about vsync.
From double to triple buffering
This is relative easy to fix as we can just increase the number of buffers in the swap chain to 3 which allows us to queue a completed frame and immediately begin processing the next frame, even if the GPU needs to wait for the next vblank before rotating the swap chain. Here’s the updated pseudo code for the rasterizer_device_initialize hook:
|
1 2 3 4 5 6 7 8 9 10 11 12 13 14 15 16 17 18 19 20 21 22 23 24 25 26 27 28 29 30 31 32 33 34 35 36 37 38 39 40 |
bool rasterizer_device_initialize() { ... D3DPRESENT_PARAMETERS PresentParams = {0}; PresentParams.BackBufferWidth = rasterizer_globals.screen_bounds.x1 - rasterizer_globals.screen_bounds.x0; PresentParams.BackBufferHeight = rasterizer_globals.screen_bounds.y1 - rasterizer_globals.screen_bounds.y1; PresentParams.BackBufferFormat = D3DFMT_A8R8G8B8; PresentParams.EnableAutoDepthStencil = TRUE; PresentParams.AutoDepthStencilFormat = D3DFMT_D24S8; PresentParams.Flags = D3DPRESENTFLAG_LOCKABLE_BACKBUFFER; PresentParams.FullScreen_RefreshRateInHz = g_refresh_rate_hz; PresentParams.FullScreen_PresentationInterval = D3DPRESENT_INTERVAL_IMMEDIATE; ... // Setup back buffer count and swap effect for triple buffering. PresentParams.BackBufferCount = 2; PresentParams.SwapEffect = D3DSWAPEFFECT_DISCARD; PresentParams.PresentationInterval = D3DPRESENT_INTERVAL_ONE; // Check if wide screen mode is enabled. if (g_widescreen_enabled != 0) PresentParams.Flags |= D3DPRESENTFLAG_WIDESCREEN; // Check if the video mode supports progressive scan. if (g_progressive_scan_enabled != 0) PresentParams.Flags |= D3DPRESENTFLAG_PROGRESSIVE; // Check the resolution width to see if 1080i is enabled. if (rasterizer_globals.screen_bounds.x1 == 1920) { PresentParams.Flags &= ~D3DPRESENTFLAG_PROGRESSIVE; PresentParams.Flags |= D3DPRESENTFLAG_INTERLACED; } g_pDirect3D->CreateDevice(0, D3DDEVTYPE_HAL, NULL, D3DCREATE_HARDWARE_VERTEXPROCESSING, &PresentParams, &g_pD3DDevice); ... } |
Here I’ve increased the back buffer count to 2 (default is 1), and set the swap effect such that the swap chain will be rotated on each present call. This will give us 3 buffers to work with (2 back and 1 front), but we’ll need to make another modification to the game’s rendering engine to account for this additional buffer. Earlier when I was going through the process of resizing the game’s render targets I showed some code for how the game sets up texture views for the back and front buffers for use in rendering passes:
|
1 2 3 4 5 6 7 8 9 10 11 12 13 14 15 16 17 18 19 20 21 |
bool rasterizer_primary_targets_initialize() { // Get the back buffer, front buffer, and depth buffer surfaces. global_d3d_device->GetBackBuffer(0, D3DBACKBUFFER_TYPE_MONO, &global_d3d_surface_render_primary[0]); global_d3d_device->GetBackBuffer(-1, D3DBACKBUFFER_TYPE_MONO, &global_d3d_surface_render_primary[1]); global_d3d_device->GetDepthStencilSurface(&global_d3d_surface_render_primary_z); ... global_d3d_texture_render_primary[0] = (IDirect3DTexture8*)malloc(sizeof(IDirect3DTexture8)); global_d3d_texture_render_primary[1] = (IDirect3DTexture8*)malloc(sizeof(IDirect3DTexture8)); // Setup texture views for back/front buffers. for (int i = 0; i < 2; i++) { XGSetTextureHeader(640, 480, 1, 0, D3DFMT_LIN_A8R8G8B8, 0, global_d3d_texture_render_primary[i], global_d3d_surface_render_primary[i]->Data, 0); } ... } |
Each frame after the game calls Present() it’ll swap the Data field in global_d3d_surface_render_primary[0]/[1] and global_d3d_texture_render_primary[0]/[1] so they point to the correct memory for the new back and front buffers. This works fine when the game is double buffered but now that we introduced a third buffer into the swap chain we’ll need to account for this after the game calls Present(). We’ll also need to update the rasterizer_primary_targets_initialize hook from earlier to initialize these buffers correctly before the first frame is drawn. Here is the pseudo code for these functions:
|
1 2 3 4 5 6 7 8 9 10 11 12 13 14 15 16 17 18 19 20 21 22 23 24 25 26 27 28 29 30 31 32 33 34 35 36 37 38 39 40 41 42 43 44 45 46 47 |
void Hook_IDirect3DDevice8_Swap() { // Call the trampoline and let the real function run. IDirect3DDevice8_Swap_trampoline(); // Check if triple buffering is enable. if (Hack_TripleBufferingEnabled == false) return; // Release references to the old back buffer. global_d3d_surface_render_primary[0]->Release(); global_d3d_surface_render_primary[1]->Release(); // Get the new back buffer and increment the reference count twice. global_d3d_device->GetBackBuffer(0, D3DBACKBUFFER_TYPE_MONO, &global_d3d_surface_render_primary[0]); global_d3d_device->GetBackBuffer(0, D3DBACKBUFFER_TYPE_MONO, &global_d3d_surface_render_primary[1]); // Update the Data field for the back buffer textures. global_d3d_texture_render_primary[0]->Data = global_d3d_surface_render_primary[0]->Data; global_d3d_texture_render_primary[1]->Data = global_d3d_surface_render_primary[0]->Data; } bool Hook_rasterizer_primary_targets_initialize() { // Call the trampoline and let the real function complete. bool result = rasterizer_primary_targets_initialize_trampoline(); // Check if triple buffering is enabled. if (Hack_TripleBufferingEnabled != true) { // Set both primary render surfaces to point to the active back buffer. global_d3d_device->GetBackBuffer(0, D3DBACKBUFFER_TYPE_MONO, &global_d3d_surface_render_primary[0]); global_d3d_device->GetBackBuffer(0, D3DBACKBUFFER_TYPE_MONO, &global_d3d_surface_render_primary[1]); // Update the Data field for the back buffer textures. global_d3d_texture_render_primary[0]->Data = global_d3d_surface_render_primary[0]->Data; global_d3d_texture_render_primary[1]->Data = global_d3d_surface_render_primary[0]->Data; } // Update the dimensions of the surface/textures created to match the resolution of the back buffer. Hack_UpdateD3dPixelContainerForScreenResolution(global_d3d_texture_render_primary[0]); Hack_UpdateD3dPixelContainerForScreenResolution(global_d3d_texture_render_primary[1]); Hack_UpdateD3dPixelContainerForScreenResolution(global_d3d_texture_z_as_target[0]); Hack_UpdateD3dPixelContainerForScreenResolution(global_d3d_texture_z_as_target[1]); return result; } |
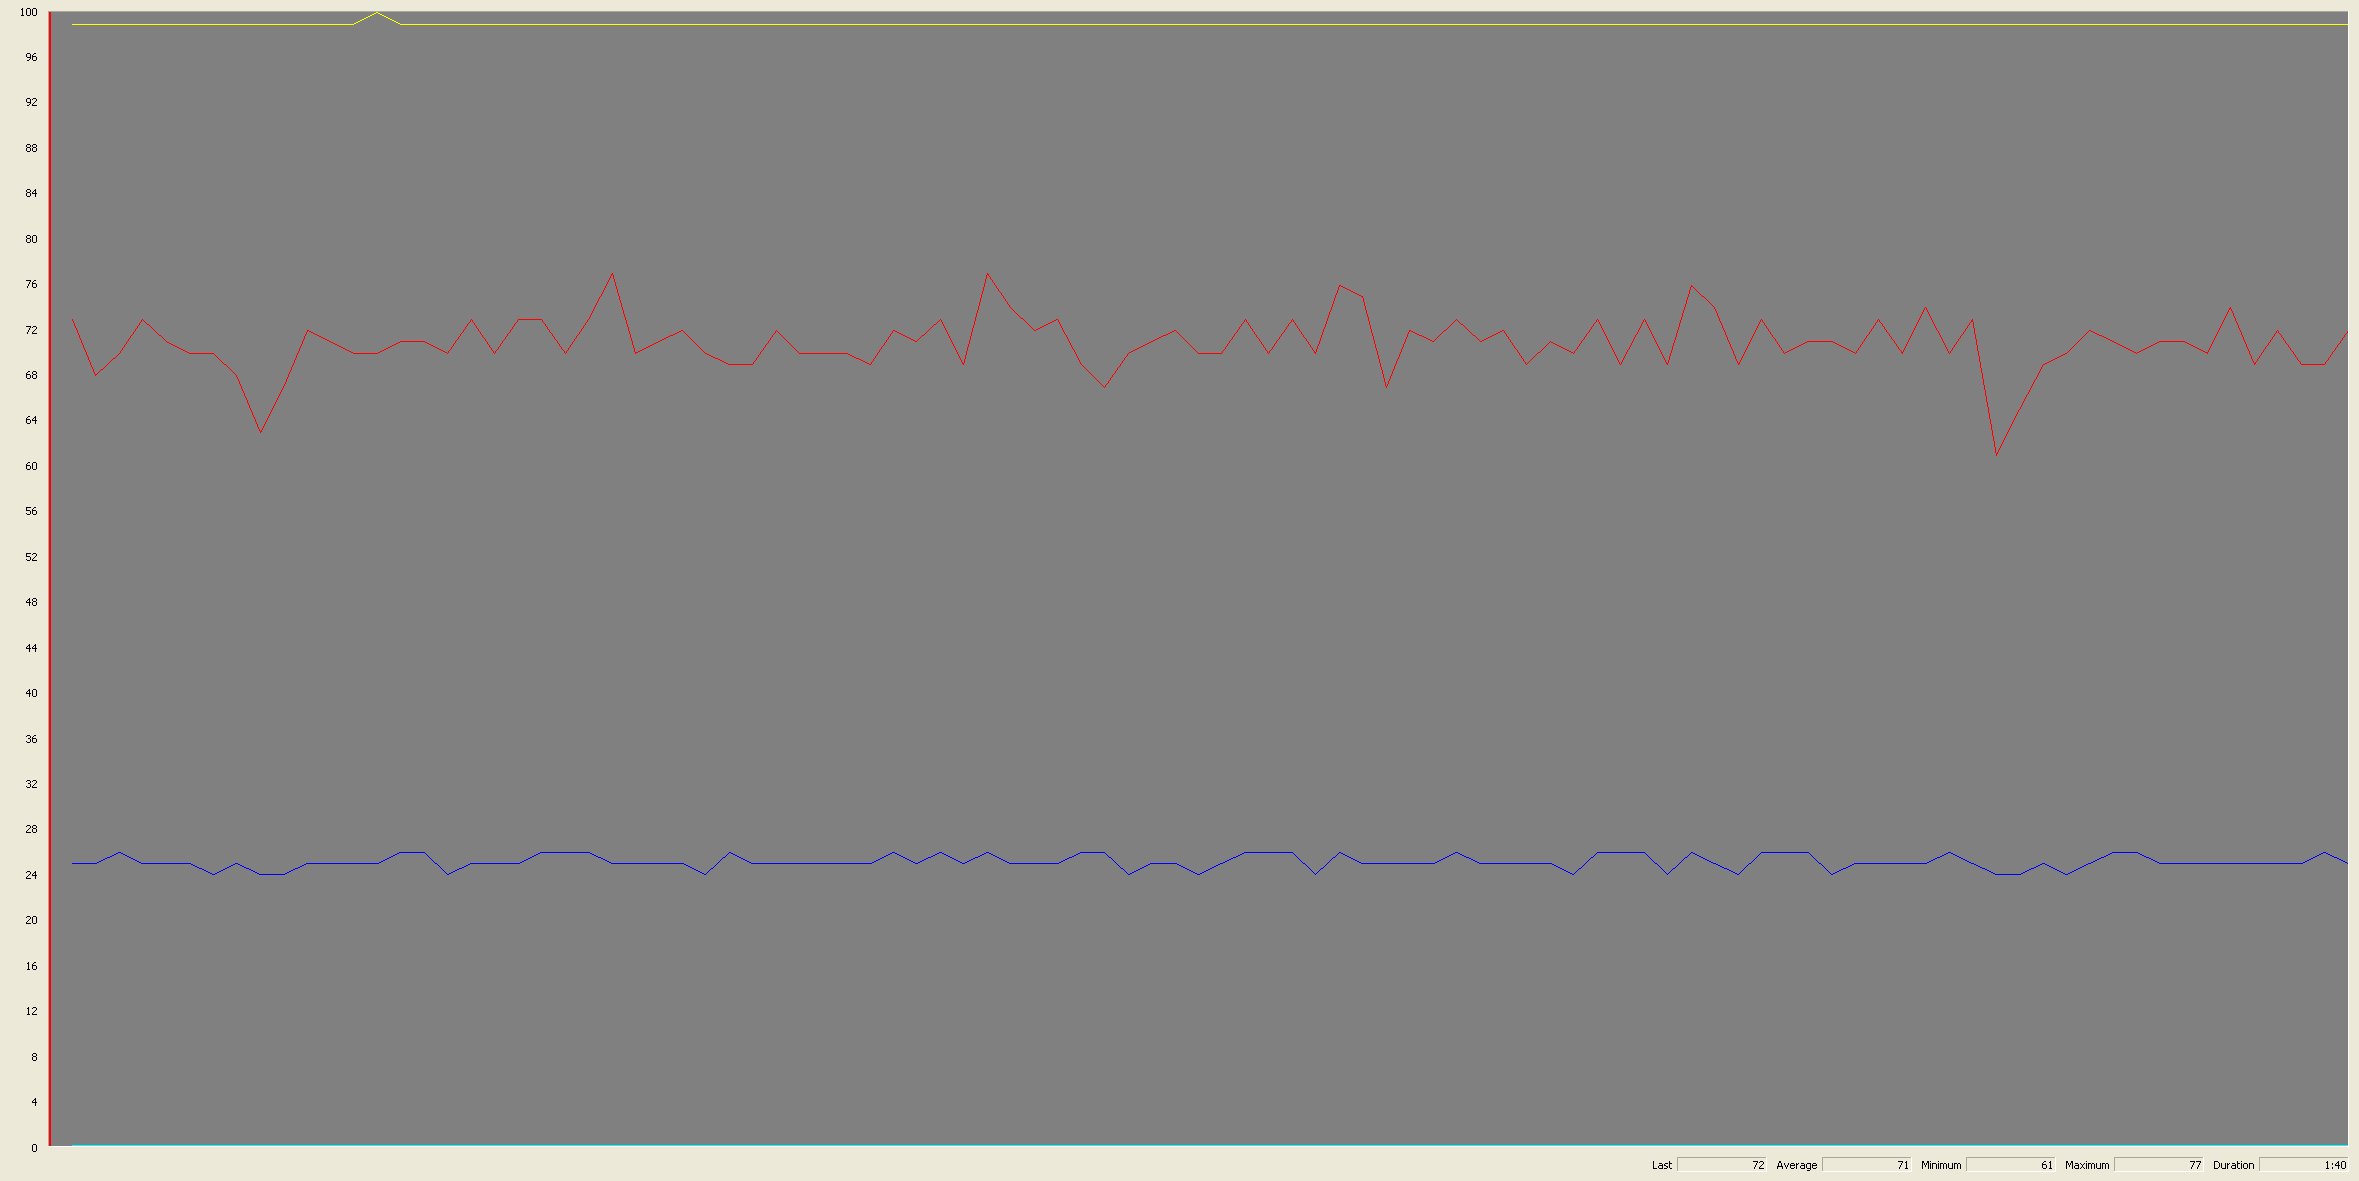
With this change global_d3d_surface_render_primary[0]/[1] and global_d3d_texture_render_primary[0]/[1] will always reference the current back buffer. After the Swap hook returns the game will still swap global_d3d_surface_render_primary[0]/[1] and global_d3d_texture_render_primary[0]/[1] internally but this is basically a no-op since they point to the same underlying memory. Now, you might be thinking global_d3d_surface_render_primary[1] is supposed to point to the front buffer per the game’s original implementation, so what happens now that global_d3d_surface_render_primary[1] always points to the back buffer? And the answer, is nothing. The game never used the front buffer because it can’t do anything meaningful with it while it’s being drawn to screen. It only held the pointer so it could swap the surfaces every frame. With these changes in place I loaded up the Zanzibar benchmark scene and collected some new performance measurements:
As we can see the swap stall line is gone and the FPS is sitting at ~22 which is +~3 FPS higher than before. You might be thinking that a 3 FPS increase isn’t really much but when the game is capped at 30 FPS this is actually a 10% increase which is pretty nice. Also remember that the main goal here was to eliminate the swap stall which prevented the GPU from running as fast as it could. Looking at the graph some more we can see the GPU is now maxed! This might seem bad but we now know the GPU is the bottleneck. We’re still running on stock GPU clock speed and once we overclock the GPU the performance should increase quite a bit.
Overclocking the GPU
I spent a few nights digging through some PIX traces, running tests, and trying to find any other low hanging fruit for cheap performance gains. I was able to get another +1-2 FPS by tiling the texaccum render target but it seemed like that was all I was going to get for cheap gains. There’s one or two ideas I had that might get some performance increase but they required a decent amount of changes and I wasn’t sure if the end result would even get me a 1 FPS increase, so I decided to leave it alone and maybe loop back on it another day. With the changes to tile the texaccum render target the Zanzibar benchmark scene was sitting at 23-24 FPS which was a solid improvement over the original ~19 FPS. Now it was time to turn to overclocking, and running the Zanzibar benchmark scene on the god box with overclocked GPU gave a solid 27-28 FPS. Running around the map felt smooth and the FPS was typically holding at a steady 30 FPS, though there were still some areas (like the benchmark scene) where the FPS would drop. Overall I considered it to be highly playable and was relatively satisfied with the results.
The only problem is that the god box is running a one-off bespoke BIOS image that doom made for it. While the GPU overclocking settings could be patched into other community BIOS images it wouldn’t be great if the requirement to run this HD patch was “patch your BIOS image and reflash it to your console”. Luckily I wouldn’t have to resort to that because the GPU clock generator can be controlled entirely by memory mapped IO registers. Using these registers you can control the coefficients for the clock generator and change the clock speed on the fly. So for this next patch I’m going to have the game dynamically overclock the GPU on startup.
Adjusting the clock speed
The clock signal for the GPU is calculated as follows:
|
1 2 3 4 5 6 7 8 |
NVPLL_COEFF (32 bits): Bits 0-7: M Bits 8-15: N Bits 16-18: P BASE_CLK = 16.6667 Mhz nvclk = (N * BASE_CLK / (1 << P) / M) |
The M and P values are set to 1 by default, and BASE_CLK is always 16.6667 Mhz which is sourced from a crystal on the motherboard. So the formula can be shortened to: (N * 16.6667) / 2. We’ll be modifying the N component which is set to 28 by default for a GPU clock speed of 233.33 Mhz. This will let us step the clock speed in increments of ~8 Mhz which I made configurable via an ini file that the patch loads on startup. The pseudo code for overclocking the GPU looks like this:
|
1 2 3 4 5 6 7 8 9 10 11 12 13 14 15 16 17 18 19 20 21 22 23 24 25 |
void Util_OverclockGPU(int step) { /* NVPLL_COEFF (32 bits): Bits 0-7: M Bits 8-15: N Bits 16-18: P BASE_CLK = 16.6667 Mhz nvclk = (N * BASE_CLK / (1 << P) / M) */ // Read the current clock config from the NVPLL_COEFF register. DWORD clockConfig = *(DWORD*)(NV_GPU_BASE_ADDRESS + NVPLL_COEFF); // Mask out the old N value. clockConfig &= ~0xFF00; // Mask in the new N value. clockConfig |= ((step & 0xFF) << 8); // Write the new NVPLL_COEFF value. *(DWORD*)(NV_GPU_BASE_ADDRESS + NVPLL_COEFF) = clockConfig; } |
That’s it, the GPU is now overclocked. Kind of lack luster I know, but you’re probably wondering how far can we overclock the GPU? And what does the new performance graph look like?
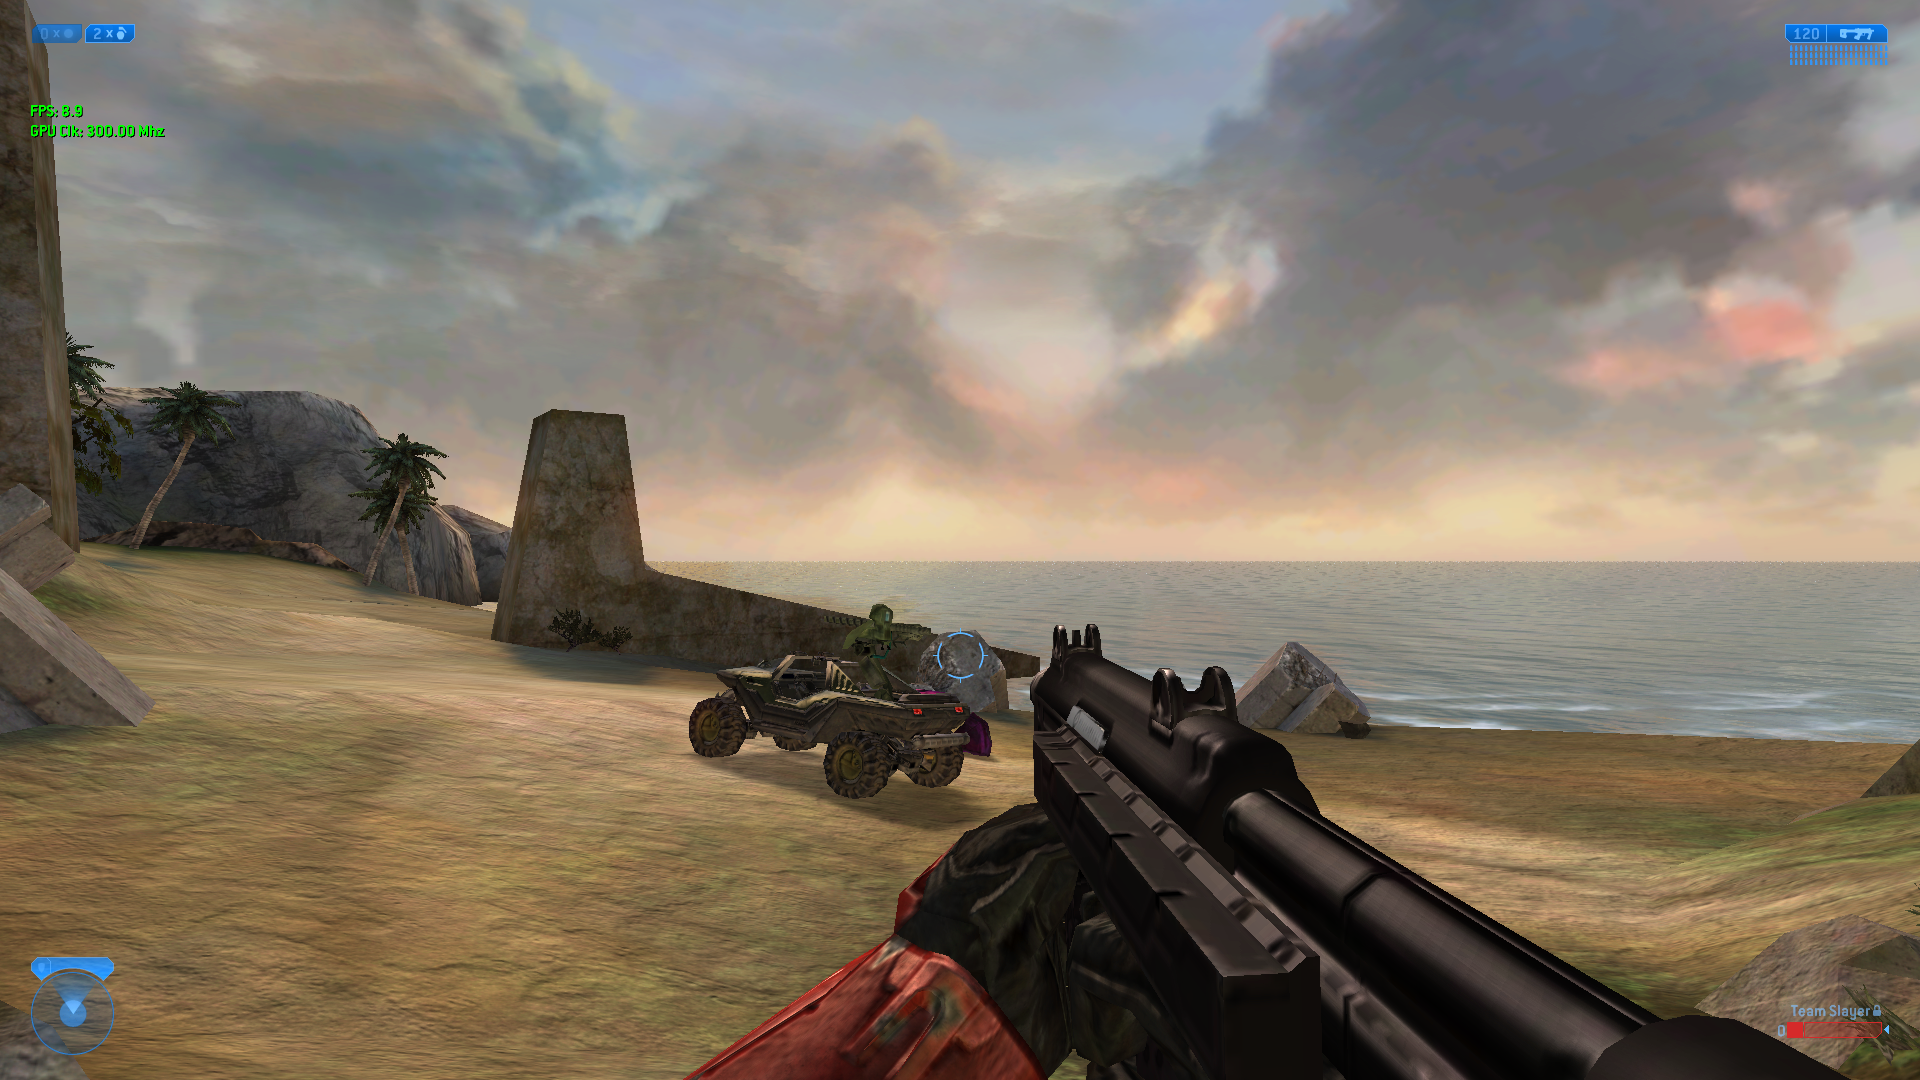
With the GPU overclocked to 300 Mhz (up from 233.33 Mhz stock) there’s a solid 3 FPS increase in performance in the Zanzibar benchmark scene compared to stock GPU clock speed. This doesn’t seem very impressive but remember this is the “benchmark” test, it was chosen because it puts a massive load on the GPU. Outside of this area there’s a noticeable increase in FPS and running around Zanzibar the game stays at 30 FPS most of the time, dipping slightly in a few heavy areas. So how far can we push the GPU? More speed better performance, right?
Semiconductor fabrication is not a perfect process and every chip has imperfections in it. While every GPU that made it into an Xbox console has minimum functional and quality requirements it had to meet, the maximum capabilities of each chip varies greatly. A lot of the GPUs in the 1.0-1.4 revision consoles are on the weaker end and seem to cap out in the low 300 Mhz range, while the GPUs in the 1.6 revision consoles have been able to go upwards of 400 Mhz stable. That’s almost a 100% increase in clock speed which is very impressive, but this won’t really improve the FPS much more (or so I think). There’s another bottleneck here, and one that can’t easily be worked around.
Another chip, another clock…
I spent a large amount of time throughout this project wondering if part of the bottleneck issue was memory bandwidth. There’s a number of articles in the Xbox SDK docs that go into great detail about the hardware in the console, the rendering pipeline, and all the gotchas you can hit that will hurt your game’s performance. There’s a number of times that memory bandwidth is mentioned and it seems the engineers believed you could max the memory bus bandwidth fairly easily. The bus has a theoretical maximum throughput of 6.4GB/s but only about 70% of that is usable in practice, for a practical max throughput of ~4.5GB/s. I captured a number of PIX traces on the game and the estimated memory usage for a single frame was never higher than low 40MBs. No matter how I ran the numbers I just could not see the memory bus bandwidth being maxed out. In my most generous calculation I estimated max throughput of 4GB/s / 30 FPS = ~135MB/frame. Even if we assume the CPU is consuming something like 50MBs that still gives ~80MBs for GPU data. Yeah 1280×720 is a lot of pixels but this would mean each frame is accessing more data than there is RAM on the console, and it was just hard to believe. However, I know very little in this area and it was very well possible that one of these numbers was off (perhaps PIX?). The engineers certainly believed it was possible so I was most likely missing or misunderstanding something.
Doom suggested I try increasing the RAM clock speed and see if FPS increases, which would indicate that memory is the likely bottleneck. The only problem is the RAM is already clocked at the practical maximum frequency of 200Mhz so you can only increase the speed by about ~10Mhz before it becomes unstable and the console crashes. After running some calculations I wrote the following snippet of code to change the memory clock speed:
|
1 2 3 4 5 6 7 8 9 10 11 12 13 14 15 16 17 18 19 20 21 22 23 24 25 26 27 28 29 30 31 32 |
void OverclockRAM() { DWORD MPLLCoeff = 0; // Read CR_CPU_MPLL_COEFF HalReadWritePCISpace(0, 0x60, 0x6C, &MPLLCoeff, sizeof(MPLLCoeff), 0); /* CR_CPU_MPLL_COEFF Bits 0-7: M Bits 8-15: N Bits 16-19: FSB_P Bits 20-23: MEM_P BASE_CLK = 16.6667 Mhz VCOFreq = (BASE_CLK / M) * FSB_P * 2 * N MEMCLK = VCOFreq / (2 * MEM_P) */ // M/N values for 208 Mhz MEMCLK: DWORD M = 3; DWORD N = 25; // Update PLL coefficients. MPLLCoeff = (MPLLCoeff & ~0xFF) | (M & 0xFF); MPLLCoeff = (MPLLCoeff & ~0xFF00) | ((N & 0xFF) << 8); // Update PPL value. HalReadWritePCISpace(0, 0x60, 0x6C, &MPLLCoeff, sizeof(MPLLCoeff), 1); } |
The M and N values above are chosen such that the resulting memory clock speed will be ~208 Mhz. I could adjust them some more and get closer to 210 Mhz but this was good enough to test. With these changes in place I booted up Halo 2, loaded up the Zanzibar benchmark scene and watched the perf monitor. I ran this test a number of times with and without the memory overclocking and the result was a solid 0.7 FPS increase when the memory overclocking was active. These test results aren’t conclusive but they’re definitely compelling.
There’s different RAM chips that work on the Xbox console and have a maximum clock speed of 250 Mhz. I searched around online and placed an order for some, but at the time of writing this I haven’t gotten to installing them or running any further tests. Doom has already tried using these memory chips and said he had trouble getting them above ~230 Mhz while the GPU was overclocked, and that there’s likely another piece to the puzzle to get them running any higher. I wanted to “push the console to the limits” with this patch but I was now 3 months into development of it and needed a break. Ultimately, even if I could get these other RAM chips running close to 250 Mhz I’d more or less be the only person able to utilize it as they’re hard to come by, quite costly, and require removing any existing RAM chips from the console motherboard before installing. With the chips on order I decided to save this experiment for future me and continue on with finishing the patch.
Reducing pop-in
Halo 2 had some notoriously bad pop-in issues with textures and geometry and this issue has only been exacerbated on consoles that are still running the original mechanical HDDs from the early 2000s. But now that we have all this extra RAM this should be easy to solve. Earlier I talked about the game making a single large memory allocation of ~48.9MB that I referred to as the “runtime data region”. This memory region is divided up into smaller sections for various subsystems in the game such as network resources, geometry cache, texture cache, sound cache, level data, etc.
The ones we’re interested in are the texture cache and geometry cache. The geometry cache is given 6.5MB of space for single player maps and 7MB for multiplayer maps. The texture cache size varies and is given all the remaining data after the “tag data” section and before the “low detail texture cache”. The larger the map the smaller the texture cache will be and the more pressure that’ll be put on it (especially for single player maps). These caches are “least recently used” data structures (or “lruv caches” as the game refers to them, not sure what the v is…), and work by evicting the least recently used data after a certain time period has elapsed. Every 30 frames (~1 second) the game will iterate through each cache and evict any data that hasn’t been used in the last 30 frames to free up space. If a request is made to load in data and there’s enough free space in the cache the data is loaded immediately (typically asynchronously, though it can block) and the request is satisfied once the read completes. If the cache is full there’s two code paths that can be taken:
- The caller can specify a parameter that indicates they want to force eviction on some other data. In this case the game will iterate through every entry in the cache and forcefully evict the least recently used items until there’s enough free space to satisfy the load request. If those items are currently being displayed on screen they’ll disappear in the next frame (and most likely submit new cache load requests).
- The caller specifies they don’t want to force eviction and the load request fails. The object will not appear on screen this frame and the game will try to load it again next frame.
Almost every call site for a load request falls down code path #2 with very few locations falling down code path #1. This is the first cause of pop-in, a request to load data is made and fails resulting in the object not being displayed on screen at the proper time. When the data is successfully loaded it will “pop” on screen and typically be far enough into the players field of view that they notice it. In the case of texture loads the map file can have up to 3 different texture buffers for low, medium, and high level of detail (LOD) versions of the same image. This is not to be confused with mip maps because each texture LOD will have its own set of mip maps. When a request is made to load in a texture the game will default to using the highest LOD possible, and if the load request fails it will try again using medium and low LOD buffers in hope that they require less memory and the load request may be possible to satisfy without waiting for memory to become available. If a load for a lower LOD version of the texture succeeds the game will attempt to load the highest LOD possible in the next few frames when more memory (hopefully) becomes available. When this happens the texture will be visible immediately at lower detail and then “pop” to higher detail when it becomes available. This is typically noticeable in cut-scenes which have the highest on-demand load requirements compared to normal game play.
Using cache eviction to find super bounces
One additional note is that each map file also contains a “low detail texture cache” which contains an “emergency” version of almost every bitmap the map uses, in sizes from 2×2 pixels to at largest 8×8 pixels, which is always resident in memory while playing. This is used in cases where a model is present in memory but the load request for the texture(s) failed at all LODs. In this scenario there would normally be no textures to render the model with but the emergency low detail texture cache can be used temporarily to get the model on screen until the normal texture can be loaded into memory. Back in the Xbox Live days of Halo 2 there used to be a “glitch” where if you pulled up the Xbox Live friends menu and then closed it the level geometry would be rendered with extremely low detail textures. If you looked closely enough you could see “cracks” in the geometry (really, just where non-co-planar triangles were joined together) that you could try and use for super bounces. This technique was used to find suitable places for performing super bounces and I even remember finding a few myself using this method. It turns out this isn’t actually a “glitch” but the game using the emergency low detail texture cache because the normal textures for geometry were evicted and the geometry needs to be rendered this frame.
Visualizing cache usage
When I first started adjusting the geometry and texture cache sizes I could definitely see pop-in was being reduced but I didn’t really have any good indication of when the caches were large enough and further tweaks were just redundant. After scraping through every Halo 2 build I had along with the Vista and MCC versions on PC, I was able to find enough info to recreate a debugging feature that Bungie had implemented in their debug builds of the game (this was such a pita). Using this graph visualization I could see exactly how much of the cache memory was being used at any given time which let me fine tune the sizes to what I felt was a pretty good result.
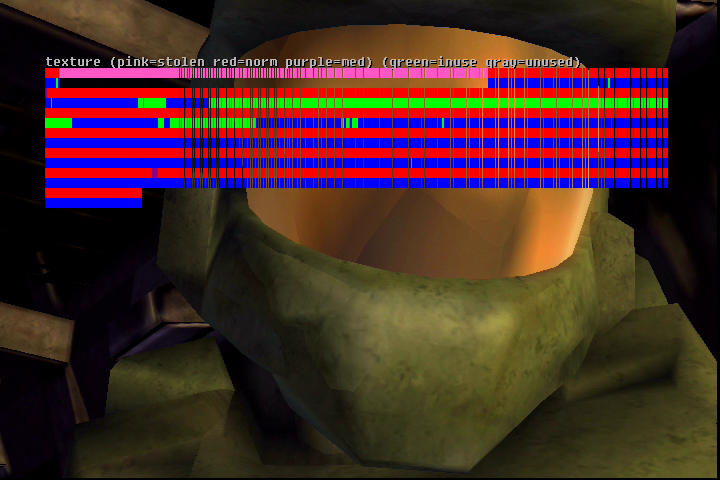
On the stock version of the game the campaign map Outskirts (old mombasa) has a texture cache size of ~19MB. I chose this map as my test map because the opening cinematic had pretty noticeable pop-in and with the original HDD in the console it could be comically bad at times. The image above shows the texture cache graph visualization. The graph is broken up into pairs of 2 lines. The first line indicates how the memory is being used: gray = free, red = in use high detail, purple = in use medium or lower detail (aka memory pressure), pink = stolen. The second line indicates when the memory was last used: green = in use this frame, blue = in use the last 30 frames. As a side note the game can steal memory from the texture cache for other purposes such as for rasterizer render targets that are only used in cinematic cutscenes, playing the intro/attraction/credits videos, etc. As we can see in the image above master chief is being rendered using the low detail texture cache because the normal texture cache is full and there’s no memory to satisfy the texture load request. Every single texture in the cache is either in use this frame or some time in the last 30 frames. So until enough textures age out and get evicted, master chief will be stuck in low detail.
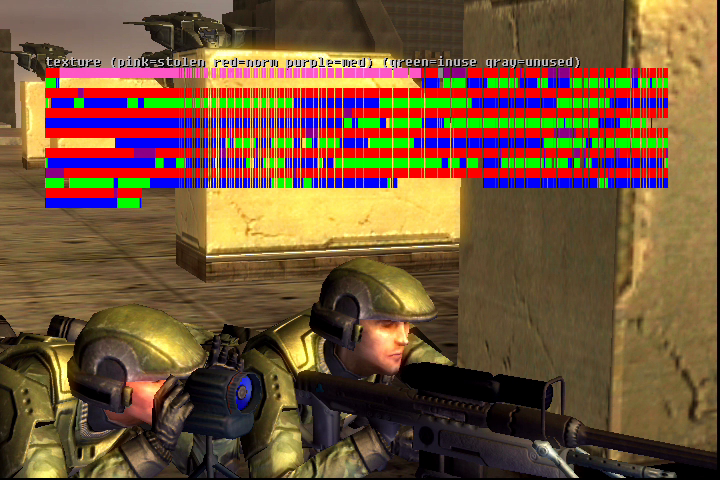
This scene with the sniper team is one of the heavier scenes in the opening cutscene and would often result in model and texture pop-in. We can see from the texture cache graph that almost all of the memory is in use and there’s quite a few textures that are being loaded at medium or lower detail (in purple) due to the memory pressure. I also implemented an almost identical graph view for the geometry cache and using both of these I began to fine tune the cache sizes until the pop-in issues were more or less gone.
Increasing the cache sizes
The final result is the geometry cache being increased from 6.5/7MB to 20MB, and the texture cache increased to a static size of 30MB, nearly doubling both caches in size from the stock version of the game. At these sizes I felt the caches had adequate space and texture and model pop-in was more or less resolved.
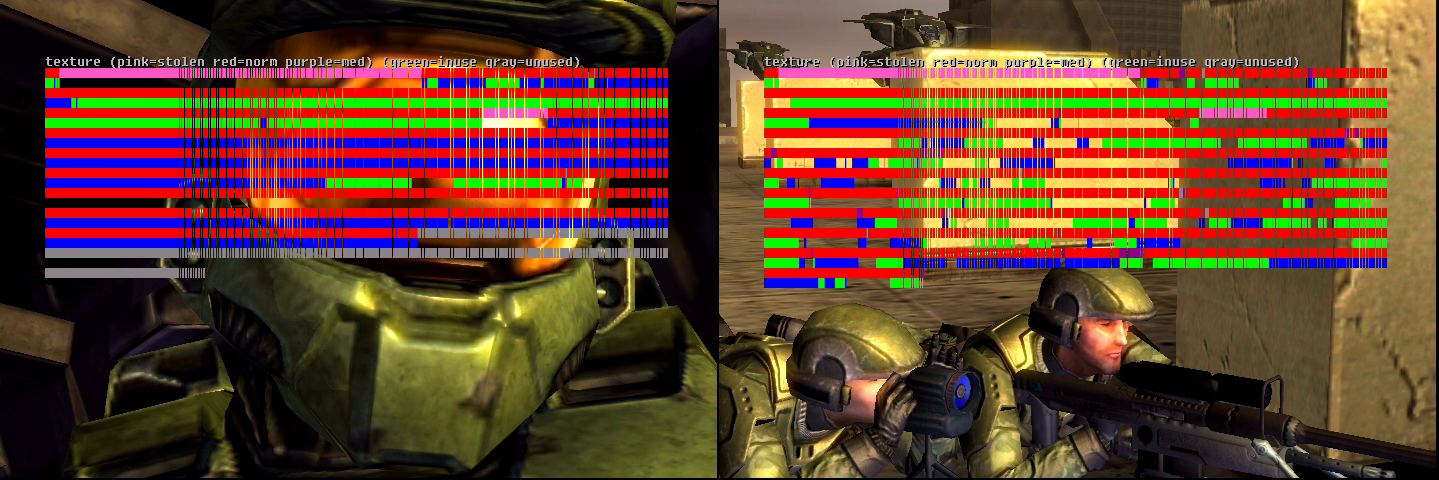
As we can see the scene where master chief would appear with low detail textures now appears with high detail textures immediately (no more pop-in!) and there’s even plenty of free space in the texture cache. For the sniper scene we can see that in the previous frames all of the cache memory was being utilized, but not all at the same time as there’s plenty of chunks where the texture data has aged out of the cache. However, there were still a few cases where things would pop-in even though there was free space in the caches. To further fix this I ended up adding support to increase the HDD transfer speed from the stock UDMA 2 speed (~33.3MB/s) to UDMA 3 (~44.4MB/s) or UDMA 5 (~100MB/s) if your console had an 80 pin IDE cable. This provided a 10% increase in transfer speeds for consoles running the stock IDE cable and up to a 300% increase (theoretically, the actual transfer speeds depend greatly on the size of data being transferred) for consoles with an upgraded IDE cable. This not only helped with the remaining pop-in issues but greatly reduced loading times for the game as well. At this point I was pretty satisfied with the result.
The final memory profile
So after all these changes what does the final memory profile look like for Halo 2 in 720p on a console with 128MB of RAM?
The geometry and texture caches are now huge, and more than 75% of the available 128MB of RAM has been utilized. For 1080p mode I actually had to dial the geometry and texture cache sizes back a bit as the memory used by the swap chain and rasterizer targets was so large there wasn’t enough memory remaining for the increased caches, and more or less all 128MB of RAM was in use.
Conclusion
I wanna thank everyone that took the time to read all the way through this blog post. This is the longest post I’ve written to date and I tried to keep it as short as possible and even cut a bunch of smaller, less interesting things out. I also wanna give a huge thanks to Doom for encouraging me to do this work, providing hardware for testing, and insight into some deep technical areas. This project was a ton of fun to work on and I learned a lot throughout the process. I always wanted to work at Bungie on a game like Halo but never got the chance to do so, and working on this project in some ways felt like I actually got to work on the game. There’s still room for improvement with a lot of the performance and memory changes I made. But overall I feel this HD patch has pushed Halo 2 and the Xbox console to their limits and I’m satisfied with the results without trying to go any further.
You can find the download and source code for the Halo 2 HD patch here: GitHub
I also made a video showing side-by-side comparisons of the stock game vs the HD patch, and performance metrics for each video resolution:
Not sure why you kept talking like the lack of 1080p output killed any benefit to rendering at 1080p… it just means you can take advantage of awesome Super Sample Anti Aliasing instead for a significantly better looking 720p image than if the game natively rendered at 720p!
SSAA of course incurs the exact same performance impact as rendering at 1080p with 1080p output (if such output were to exist) but to talk like there’s no benefit without also having 1080p output is just weird.
It’s not so much the lack of 1080p output as it is the performance being too poor. I actually considered trying an experiment to remove/bypass the video encoder on the Xbox motherboard and replace it with the one that’s used on the XboxHD+ modchip (which supports 1080p). Even if I could get it to work at normal resolutions I wasn’t sure if it’d be possible to get the GPU to “talk” to it at the speeds required for 1080p, or if the pixel bus could handle that much throughput. But once I saw the game ran as bad as it did at 1080p I basically gave up on the idea entirely.
SSAA could be enabled but there’s some caveats that would only make it worthwhile at 2x and the 2x filters aren’t great imo (4x is where it starts to shine but would have worse FPS than normal 720p). Once I ran into the memory throughput bottlenecks I basically abandoned the idea of trying to enable SSAA.
Great work on the reverse engineering and code optimization, I’m really impressed and amazed people are able to do miracles with closed source code.
This is awesome! I always kind of figured that the 128MB “patches” for certain games you used to be able to find weren’t really “patches” in the sense of the game actually being able to take advantage of the extra memory. Devkits not allowing games to utilize the extra 64MB of memory actually makes total sense, I used to wonder about that too.
Loved this very much.
I would love to get more information on the Tag system, back in those days I used some of the modding tools and was just struck by how interesting the tags were, I didn’t really undestand more than a small part of it, and after programming for a while after I still don’t have much more insight now then I did then.
I would love to read a write up.
Thank you!
I don’t have any plans on doing a post about the tag system but later this year I’ll be releasing a new modding tool that’ll have some info on it in the GitHub wiki pages. I may do a “retrospective” post on lessons I learned/challenges I faced throughout the development of the tool, but it won’t be specific to the tag file system.
Nice article! I’m not familiar with PIX but for memory bandwidth you need to consider all the texture reads and writes for every draw call/render pass as well as all the vertex data too of course for each model. It’s totally possible to read/write more data than available ram. As you mentioned earlier render target memory is re-used throughout the frame. It all incurs a memory bandwidth cost!
Thanks! PIX does report some metrics for bandwidth consumption but I’m not sure if it’s the size of all assets used or the size of all memory accesses performed for the entire frame. At one point I ran some tests to try and determine which it was and I thought the results pointed at it being the latter, but I honestly can’t remember anymore, and for all I know the numbers it’s reporting aren’t accurate.
Hi this is really cool! I had some ideas… what about forcing low textures only and trying to modify tickrate and patch for 60 fps? Might be cool if the original xbox can handle 480p 60 fps low textures only? 🙂
Patching the tick rate is difficult because the physics updates are also tied to it and weird things start happening if it’s changed. It could be patched to update on separate intervals but it’d be quite a bit of work to still not hit 60 FPS and render in extremely low detail.
Awesome write up! Any chance you could do a patch for burnout 3: takedown?? Willing to learn if you can give me some tips. Thank you
I don’t have any plans on doing more HD patches for now. Each game is unique and requires a lot of work to support these changes properly. This was really a test to see how far I could push the hardware with all of the modifications made to it.
Realistically, how long till 1.5 support?
Probably a few months as I need to catch up on some real life things at the moment.
Very cool. Well done hacking all of this, I would not have said this was possible!!
For the memory bandwidth, the issue is not that the bus is maxed out for the whole frame. The issue is that if the GPU is hammering the bus doing a blit, it can starve the CPU which results in a L2 miss going out to main memory taking a long time to come back.
Also, LRUV cache stands for “Least Recently Used Variable-size”. As compared to a LRU cache which in blam has fixed-size slots.
Hey thanks for taking the time to read through it! I never considered I could be starving the L2 cache but thinking on it I could probably query some of the CPU performance registers and get a better idea of what’s happening on the CPU side. There’s probably nothing I could do here to improve performance but would be interesting to at least see some data around it. Perhaps if I iterate on this work in the future I’ll look into it.
There’s some very impressive engineering work that went into this game and I’ve had a great time reverse engineering and learning about it.
Yeah, the tags in Blam are great. They’d been relying on that feature since Myth: The Fallen Lords came out, so they had years to refine it. They’d also been in the habit of providing modding tools since Marathon Infinity, so it’s a real shame that only the Gearbox port of CE came with HEK.